Hello Ladies!!!

As you know I follow quite a few makeup artists on IG and the newest makeup trends that are going crazily viral are Strobing, Baking and Clown Contouring. I already wrote an article explaining what strobing is. Now, I will try to explain what Baking and Clown Contouring are. So let us get started.
Clown Contouring
I follow this makeup artist on IG, who has been on the forefront of starting this trend of clown contouring. She has taken contouring to an all new level. People like me, who are die hard fans of highlighting and contouring would love this new trend. It seems she has been ridiculed as a clown numerous times for her extreme contouring and makeup tricks. Eventually, she came up with this new trend so as to send a message that makeup is fun and also her way of expressing herself.
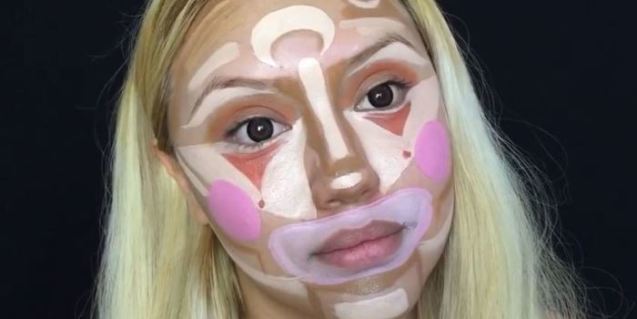
She use extreme highlight, colour correct and contour all over the face. Clown Contouring involves painting your face like you are doing a clown face paint and you apply the colours in accordance to the contouring rules as to which areas you want to highlight or chisel down and then blend. She has many videos explaining on how to do this magic.
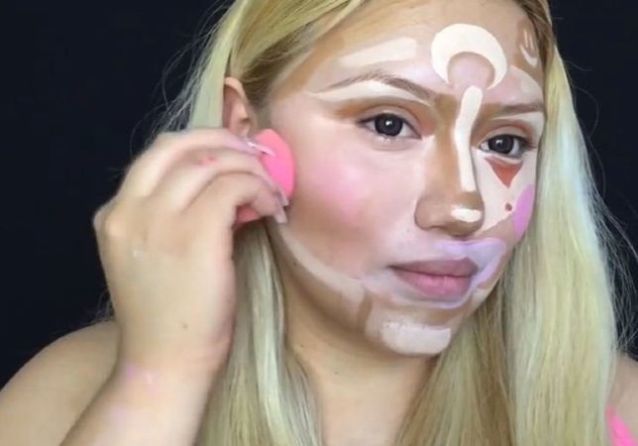
When I saw her video, I initially thought she was getting ready for some fancy dress competition. But the end result was mind boggling. She paints bright pink circles on her cheek, orange triangles under her eyes, yellow moon on her forehead and numerous lines defining and highlighting her features. Then, she blends it all to get a perfect contoured face. All you need for this is the regular contouring palettes and colour correctors like greens to reduce redness, orange for under eye areas, purple to brighten up yellow skin, a nice bright blush and your blending brushes or sponges.
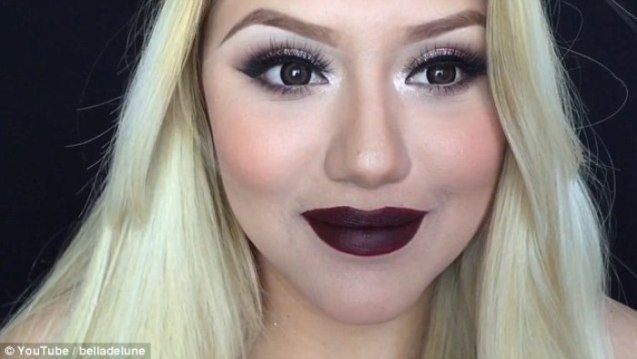
It looks cute, I tried doing it for myself, but I could not reach the perfect contoured face level as I was still looking like a clown. So, this thing definitely needs practice and REAL GOOD blending techniques.
Baking
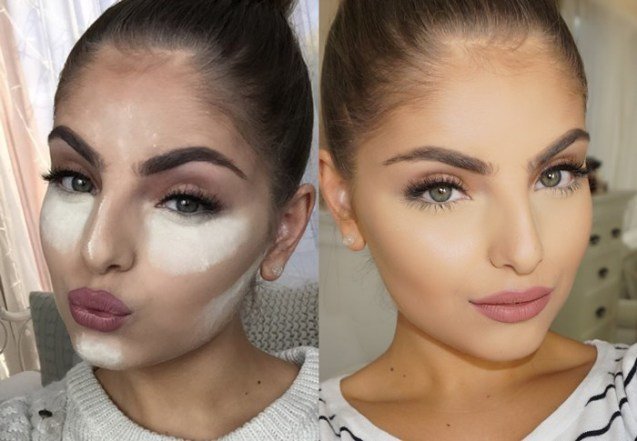
Another super cool trend in the makeup world is baking. Yes, it does sound yummy to foodies like me and trust me, it is very easy ! Baking your makeup basically means making your makeup as long lasting and flawless as possible with a bonus of highlighter. This is not really a new trend. It has been in the industry for ages now to set the makeup for stage artists and models. It also helps setting the makeup when one has to be under hot lights like celebrities. In real life, it looks a bit cakey and heavy though. Mature skin might not be able to portray it well and would look dry and cakey.
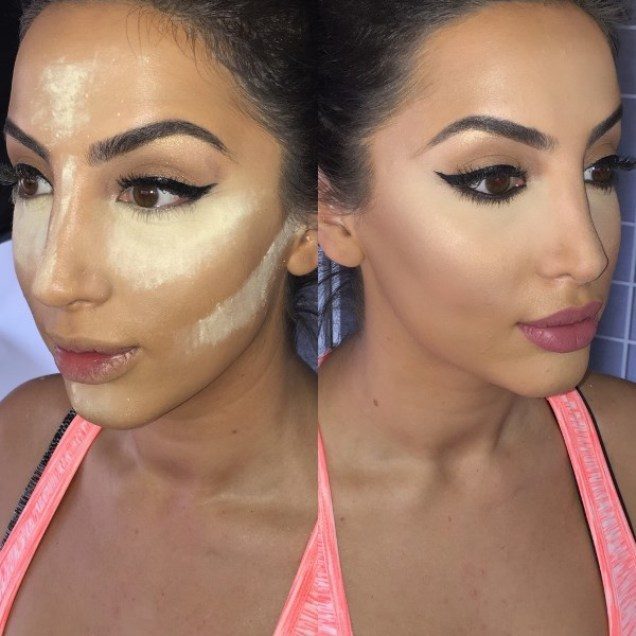
Baking basically involves applying a thick and even layer of fine setting or highlighting powder to the areas that one wants to highlight and letting it sit for around ten to thirty minutes to bake. It actually means that the body heat melts the powder into the skin during the baking time and helps give a flawless full coverage base with illumination effect.
A good light weight foundation (as baking involves layering you would not want to look full of creases and layers), some concealer and a light weight fine loose powder (a shade lighter than your skin tone) is all you need to get your makeup baking.
- First of all, hydrate your under eye area and apply your concealer right from the apple of your cheeks to the temples all the way underneath your eye in a triangle. Then get the tip of the triangle right out up to the edge of your ear. Keep it in the cheekbone area only and do not bring it down to the outer corner of your nose. Let it set for a minute or two. You can also go in for a second coat of concealer if you wish to have a more dramatic highlighted look.
- Use a fluffy eye shadow brush to apply translucent powder over the entire patch of concealer to set the base makeup.
- Use a wedge sponge and dampen it with a setting spray or merely normal water. Then dip the wedge into the translucent powder you wish to use and pack the loose powder generously over the area where you applied the concealer. Leave the powder on for five to ten minutes or even more to bake. I think with trial and error you might be able to gauge on how much time your powder takes to bake depending on your body heat.
- Using the same fluffy eye shadow brush, swirl it over the area and dust away the powder as you add more coverage to blend any harsh edges.
Taaadddaaaaaa!!!!! You are baked now. You can use this technique on cheekbones, centre of the forehead, bridge of the nose, jawline, cupids bow, chin. There are numerous videos on this as well if you wish to master the technique.
Both these trends are amazing and exciting, but really time consuming. I am sure these cannot be incorporated on a daily routine, but yes surely a good option for special occasions. What you think about them???
Should You “Bake” Your Makeup?
Too Faced Cocoa Contour Face Contouring and Highlighting Kit
How To Contour Face Using Blush
Anastasia Beverly Hills Contour Kit
Smashbox Step-by-Step Contour Stick Trio
How to Contour Face with Makeup
Tanaka Face Contouring Massage Technique
Maybelline Face Studio Master Sculpt Contouring Palette 02 Medium-Dark
E.l.f. Studio Contouring Blush & Bronzing Powder
Sleek Makeup Face Contour Kit in Medium


wow! I like baking… clown I don’t think I can even try considering my blending techniques 😛
True Vidhi..we need to be really good wid blending..
It looks appalling in the beginning but it gets gorgeous by the end. I would only consider trying these techniques when I am absolutely alone at home. She makes it look all easy. I liked reading it, Sayli.
I know Shikha, it looks super easy but as mentioned I never went pass the clown look..needs good practice though 🙂
Hearing soooo much about this technique.!
It surely is trending hot..