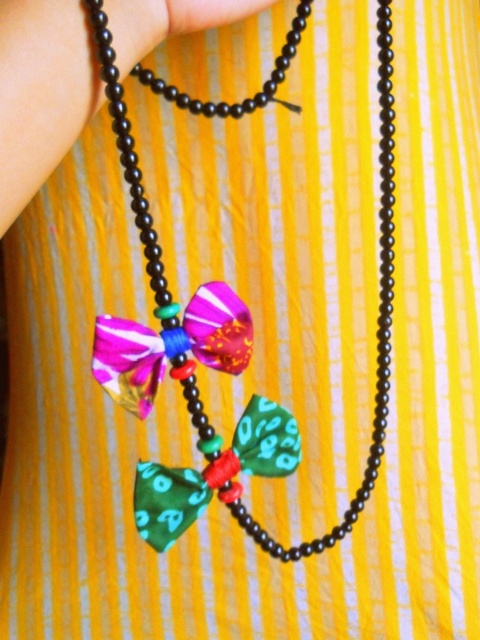
Make Your Own Bow & Bead Neckpiece: DIY
Hi sweeties!

As you all know, my DIYs are mostly of earrings. But a few days back a very dear one from IMBB asked me to do some DIYs on bracelets and neckpieces too as she is not much into junk earrings. So this one is for her 🙂 bracelets will follow, enjoy this one for the time being, I was always fascinated by the bow style, a pretty bow could make any drab dress look cool in an instant! I used to marvel at my mum’s amazing stitching abilities during childhood ( I still do!). All our dresses were made by her and she adorned each dress with home made bows, laces and frills. Today, I have tried to make a neckpiece with bows although I totally suck at stitching. All you would need for this are:
1. Scraps of fabric ( I used the leftover fabric from the dress my mum made for me), make sure you use bright colors.
2. Beads of your choice. I have used black as I wanted the bows to do all the talking.
3. Thread
4. Needle
5. Patience .

Step 1: Cut out two rectangles from any two fabric of different colors. One should be smaller than the other.
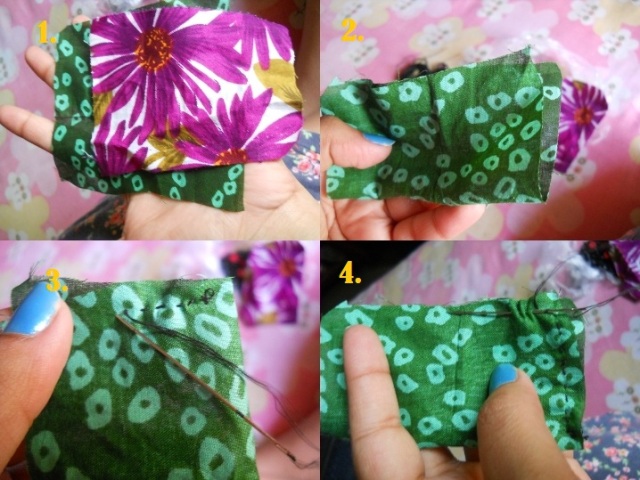
Step 2: Fold one piece into half. The brighter side of the print should be inside.
Step 3: Start sewing up the sides.
Step 4: Continue the sewing until you form a cylindrical pocket sort of thing.
Step 5: It should look like this.
Step6: Now hold the ends and roll the “pocket” inside. In this way, the brighter side will now be out and your stitches would be hidden.
Step7: Roll the end and sew it up too.
Step 8: You should have a rectangle like this!
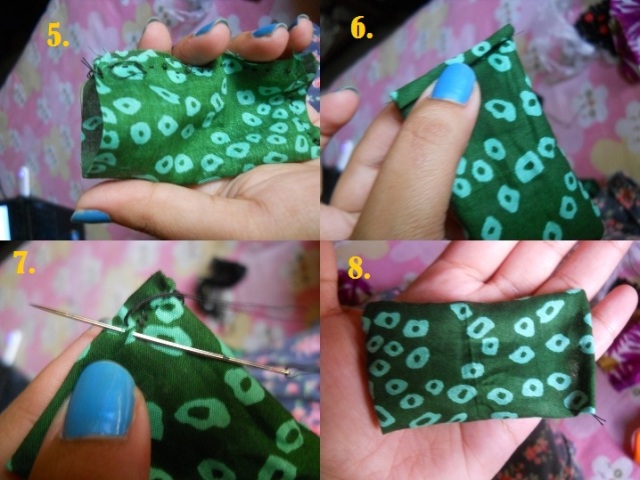
Step 9: Pinch the centre of the rectangle like so.
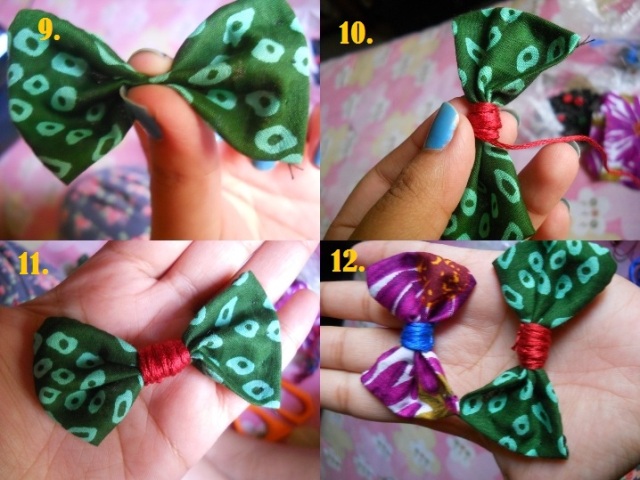
Step 10: Use a bright colored thread and start wrapping up the centre tightly. Tie a knot once you think it is thick enough.
Step 11: It should look like this.
Step 12: Repeat the steps for the other fabric and make a bow smaller than the first one.
Step 13: Measure an appropriate length of thread( as long as you wish your neckpiece to be) and start srtinging in the beads.
Step 14: Bead in till you reach more than half of the thread.
Step 15: Now string in the bigger bow.
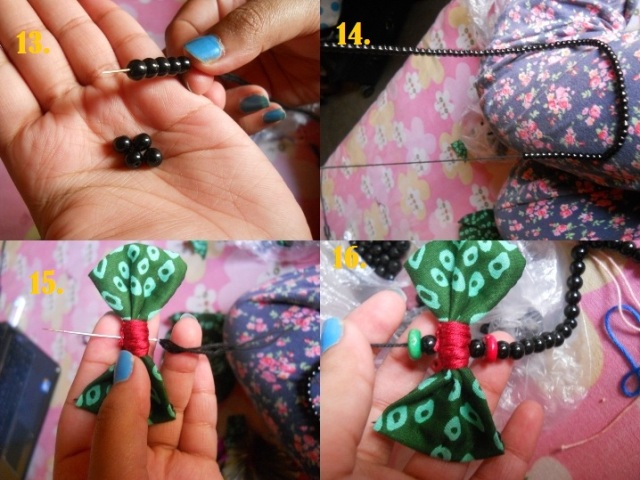
Step 16: Use different colored beads now.
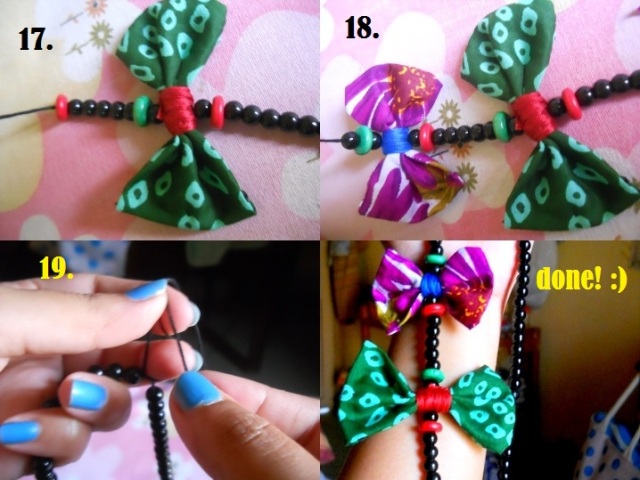
Step 17: Repeat with black beads and then string in the smaller bow.
Step 18: Now complete beading till you cover the entire thread length.
Step 19: Finally tie a knot.
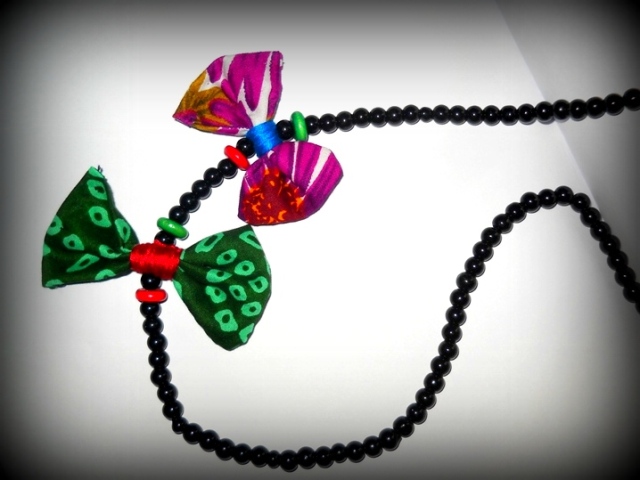
Your BB neckpiece ( bow n bead) 😉 is ready!
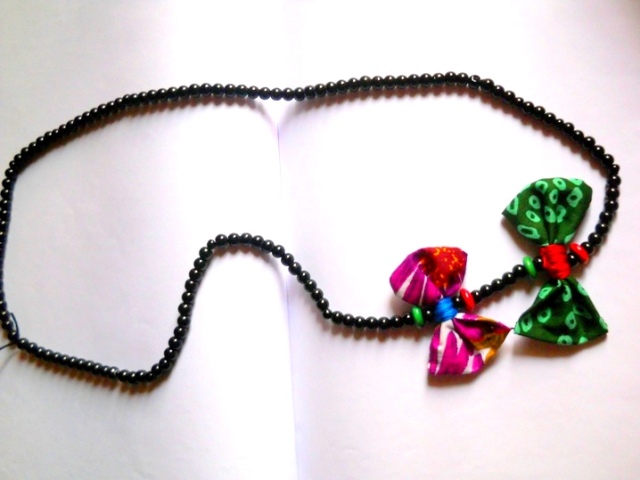
Flaunt it with a cool pair of Tee but make sure the tee is of a single color, otherwise it won’t be as prominent 🙂 I will be wearing this soon! Won’t you try it out too?
How To Layer Clothes Stylishly For Indian Summers
How To Make A Bikni Out Of Your T Shirt
How To Make Ginger Infused Skin Nourishment Pack: DIY
Aroma Magic Almond Nourishing Cream
Chanel Precision Hydramax + Active Nutrition Nourishing Cream
Fab India Coral Glow Face Pack
Easy Homemade Face Packs for Dry and Oily Skin
Anti Aging Homemade Face Pack (With Photos)
![Sandwiches_for_weight_loss[1]](https://makeupandbeauty.com/wp-content/uploads/2024/04/Sandwiches_for_weight_loss1.jpg)


haha thnks ap for listening , yes i just wear my gold and diamonds for earrings not much junk 🙂
but this one is super cute :)) would have loved to see you wearing it 🙂
thanks a lot neha! sending an OOTD post in few mins, am wearing it there in the pics 🙂
Wowww.. super cool neckpiece Aps.. 🙂 you always rock babe!! 😀
thanks a lot dear :* 🙂
Even ma mum has sent an article like dis … but dnt know wat happend to it :'( i guess rejected :'( anyways ua one is superrrr cute like always 🙂 🙂
awww, y don’t u send a reminder prachi? 🙂 thanks
Awesome aparajita…. 🙂
I was waiting for it here after seeing this on facebook from you 😉
thanks sweta! hugs! 🙂
Ah ha such a cute one :)…Ms. Jewellery designer 🙂
😉 hihi! thanks shweta!
awesome!!! 🙂
😀 thanks misha
Aww.. thats so cute aparajita 🙂
thanks sushma! <3 🙂
Super Cool … Easy own designed jewellery 🙂
🙂 🙂 thanks manisha
that’s super cool Aparajita 🙂
thanks dear 🙂
Cute DIY Aparajita, good one 🙂
thanks jomol! 🙂
Bow looks vry cute
thanks pooh 🙂
Super Cool Aparajita….. I will try it… lovely 🙂
Baba re.. How cn any1 be so talented?? Me faints and dies..
Luvd ths appy..:-*:-*
😀 thanks for those super words shilpi! made my day 😉 <3
Wow! You are sooooo creative dear. Cute necklaces! I’d love to make some for myself and my girl relatives. 🙂 I love them Aparajita! 🙂
u r the creativity queen Val! :* i showed your black gown OOTD to all my friends, such amazing ideas u get 😀 thanks, do try them, u will look cuter with these kind of necklace
I have been following your diy posts, aparajita! you are super talented! kudos to you, girl! 🙂
thanks a lot swarnali! 😀
oopsss.. i missed commenting here… my talented Aps 😉
:* 😉