Christian Wedding Eye Makeup

When it comes to a white outfit for a wedding, it is not very easy to decide on colors, but I have spent a lot of time looking at, studying white wedding gowns and the makeup that goes with it. I have been fascinated with white wedding gowns. Not just Christians, as is popularly believed, but even Arab brides wear white gowns on their wedding day. As I grew up in Saudi Arabia, you can imagine my fascination. I have narrowed down on a few ideas that can generalize a makeup look that would go with white. Now, please do bear in mind that there are no hard and fast rules, it is a personal preference but this is just my take on it.
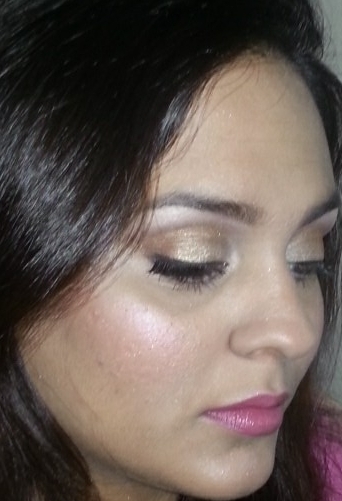
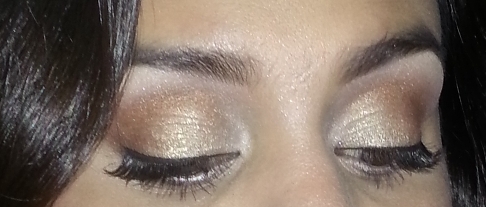
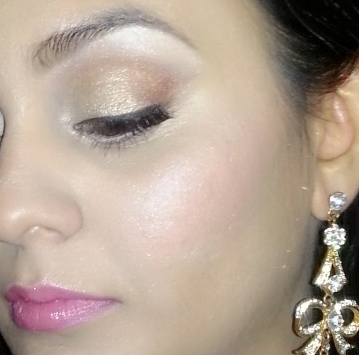
My idea is – warm shimerry gold/bronzy eyes, soft highlighted pink cheeks and luscious creamy pink lips. For every Indian skin tone, there are a bunch of gold colors that would definitely suit them and similarly, pink cheek and lip colors that would for sure suit them. These colors would not clash with a white outfit and would not make one look dull either. It is a soft look that gels with the softness of white. The shimmer and highlighted areas on the face add to the “wedding” glow factor.
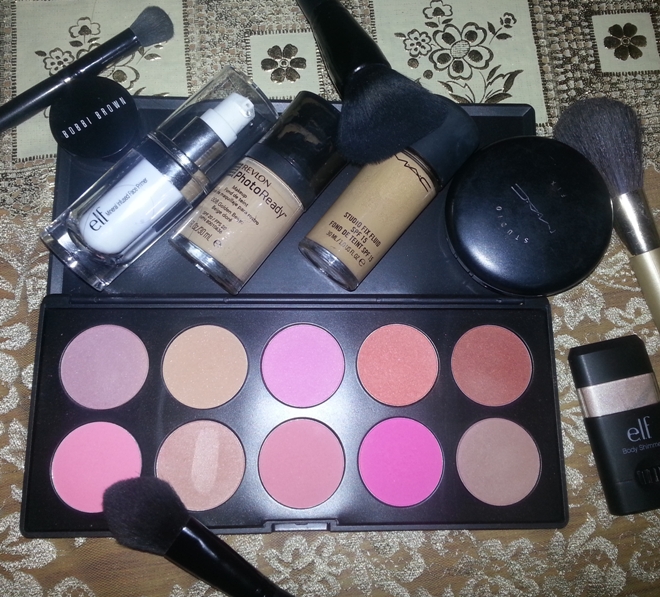
First and foremost, I will moisturize my face, let it seep in, then apply a face primer. I am normal-dry skin. For oily skinned girls, I highly recommend something like MAC’s Oil Control or similar to ensure the makeup does not budge. I first start with my eyes, before foundation or concealer. That way if there is any fall out, it will be easier to get rid of it.
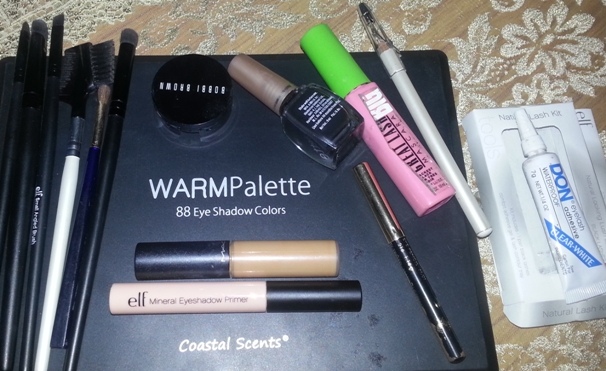
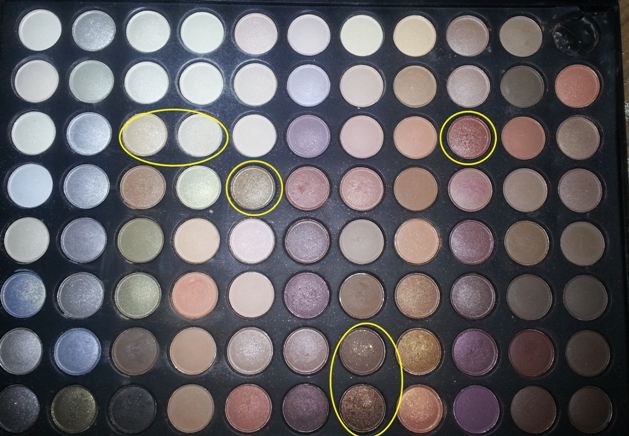
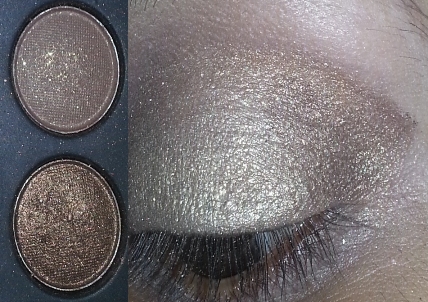
I have used the Coastal Scents 88 palette exclusively for all the eye colors, this goes to show that even a generic palette can be used for a beautiful effect. It is economical too as all colors required can be found in one palette. In the image below, I have marked the colors I will be using for this look.
Step 1:
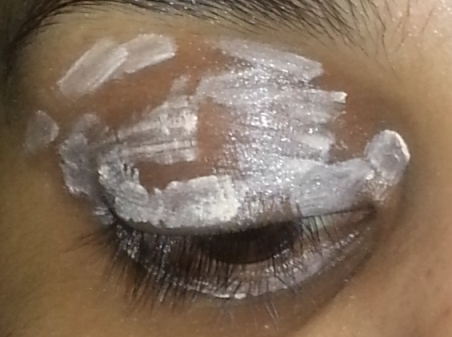
I primed my eyes with ELF Mineral Eyeshadow Primer and blended it well.
Step 2:
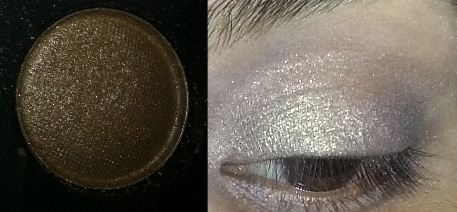
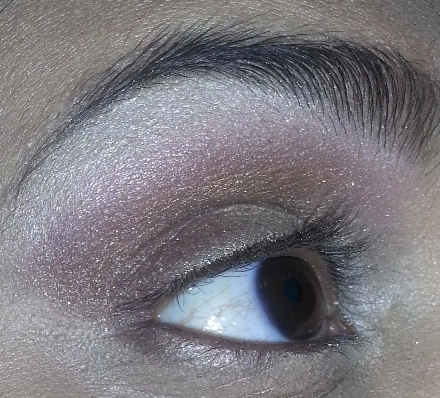
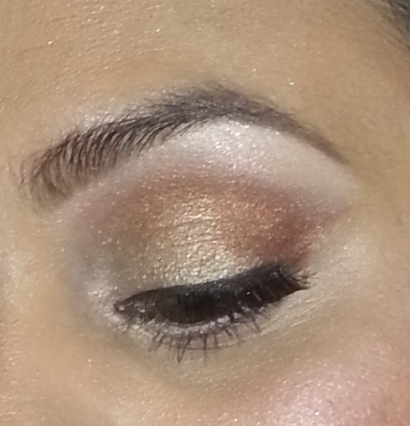
Taking a light gold color, I applied it all over my eyelid. I left the inner and outer corners slightly bare.
Step 3:
I then took a mixture of darker gold and a bronze color and used that on the outer corner. I used the darker of the 2 colors to shape out the outer V. I didn’t worry much about blending just yet.
Step 4:
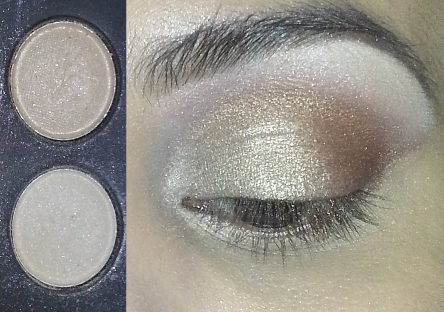
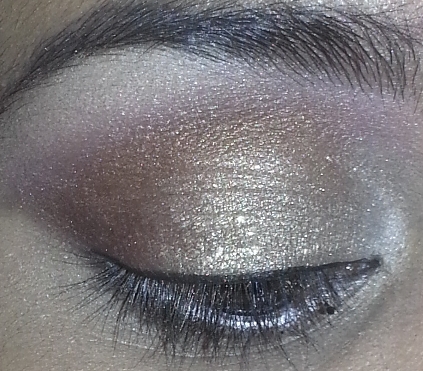
I then did my brows and on the brow bone applied a mixture of two colors to get a whitish-gold effect.
Step 5:
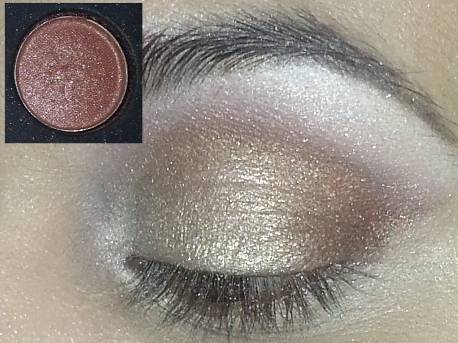
Next is blending the crease, to blend the bronze in the outer corners and the light color on the brow bone I used a rosey-brown, using a pinkish brown color in the crease to blend adds a bit of warmth and dimension. The various golds pop up more against the soft pink hue of the crease color. If you do not have a color like this, use the blush you will be using mixed with a bit of brown. It gives a beautiful effect.
Step 6:
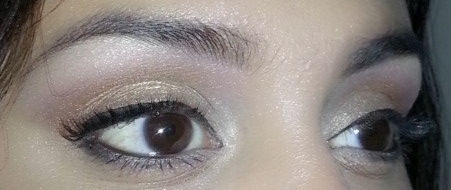
Apply the lightest gold on the inner 2/3rd lower lash line and inner corners.
Step 7:
I then applied the dark bronze color on the outer lower 1/3rd lash line.
Step 8:
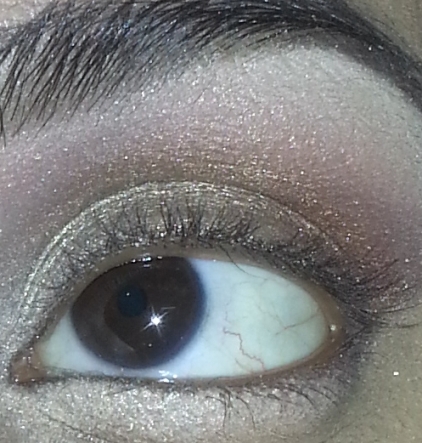
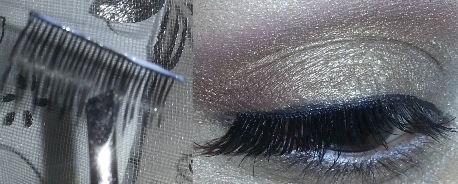
Then, I took a liquid liner and applied a very thin line. You can make your liner as intense as you desire but since I wanted to go for a soft look I used a very thin line. I will be applying lashes later, so placing down some liner will help the false lashes band gel better with the lashes.
Step 9:
I then cut a pair of wispy lashes into half and just used the inner half of falsies to place it on the outer half of my upper lash line. Use liner to darker the shine left my lash adhesive.
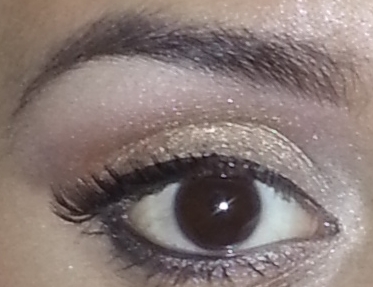
Step 10:
I then applied a white pencil on the lower water line, for my eyes to appear wider and used a black kohl pencil on the outer half, as on most Indian skins, plain white on the water line washes out & dulls the eyes, so I personally prefer adding some black or brown to deepen the look and the eye makeup is done!
Again, you can go back and add liner or blend in colors more after doing your whole look. You would have a better idea of what’s missing when the whole face is done. So it is always better to start small and add more later than the other way around.
For the face:
- I used a lighter foundation on the center of my face, something like Revlon Photoready which gives a very dewy finish. I then applied a touch darker MAC Studio Fix, which gives a very matte finish on the outer realm of my face and applied a mixture of the two on my neck and décolletage that is visible above the dress. It is important, especially for photographs that the neck, face and any exposed area above the dress have the same color.
- For under eye corrector, I used a Bobbi Brown Color Corrector and then for concealer I used MAC Select Moisture Cover. I do not have any other blemishes, acne on my face currently so concealer was not needed anywhere else.
- I then used ELF Body Shimmer Stick, which is a cream highlight on my cheek bones, bridge of my nose, cupids bow & chin. For the cheek bone, the idea is to imagine a C shape that starts at the already highlighted area on the brow bone & ends on top of the apple of the cheek.
- Then, I applied a light pink blush from the Coastal Scents 10 Blush Palette. The blush is placed just below the highlight on the cheeks but instead of extending it towards the brow bone, here I extending it towards the area between the temple and where the ear starts.
- I then applied the face powder over, MAC Studio Fix Powder, to set the foundation, concealer and cream highlight. I prefer applying blush just over the foundation before setting it with a face powder, as I have found that it adheres well to the skin and also if you end up applying a lot of blush, when you place the final compact over it, the blush gets softened. You can always add back more blush after the compact if you prefer a deeper blush.
For the lips, it is always possible to find exactly the color you have in mind, so improvise is what I did! I applied a dark almost reddish-pink liner all over my lip, then applied a mauve color over it, then took a creamy pink, as the previous 2 were completely matte colors, applied it all over the lips. Between each layer, remember to press a tissue on the lips, as this blots away the excess oils and just leaves the pigment behind. I then went back and defined the lips with the dark liner and blended it inwards with a lip brush. I then topped just the center of my lips with a glittery gloss.
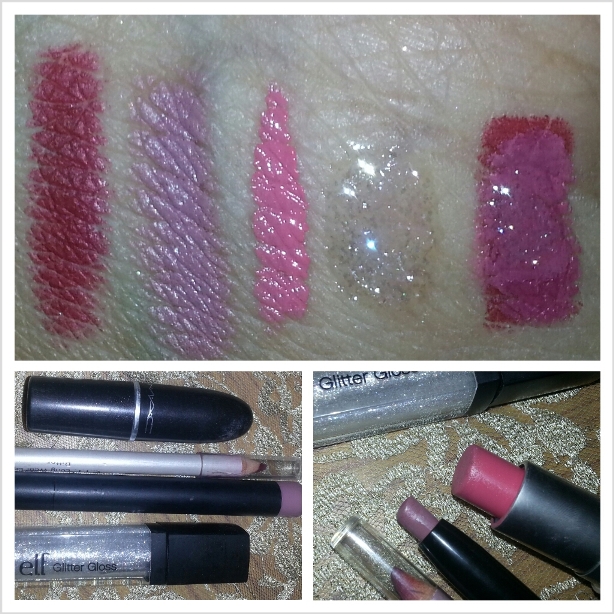
The touch of gloss only in the center adds volume to the lips and that is the completed look! I sincerely hope you all like it.
Dark Blue Smokey Eye Makeup
Shimmery Grey Black Smokey Eye Makeup Tutorial
Silver Plum Eye Makeup Tutorial
Lakme Eye Quartet Botanica Green Eye Makeup Tutorial
Easy Office Eye MakeUp Tutorial
Silver Smokey Eye Makeup Tutorial
Eye makeup tutorial using MAC Siahi Fluidline
Golden Black Eye Makeup Tutorial
Easy 3-minute Neutral Eye Makeup Tutorial
Eye Makeup: Soft Smokey Eyes- Makeup Tutorial
Blue Pink Eye Makeup Tutorial
Eye Makeup Tutorial : Golden Bronze
Diwali Makeup Tutorial – Glitterly Golden Blue Eyes
Estee Lauder Blue Dahlia Eye Makeup Tutorial
Pretty Green Eye Makeup Tutorial
Soft Green Eye Makeup Tutorial
Golden Brown Eye Makeup Tutorial


beautiful nafisa! and you ve got such beautiful flawless skin!
Thanks parita 🙂
But that is also makeup ka kamaal 😉
loved the tutorial nafisa 🙂
Thanks surbhi! 🙂
such a detailed tutu it is Nafisa *jaiho*
v v pretty eye makeup 🙂 🙂 thanks for sharing 🙂 n u Look gawjuss 🙂
Thanku so much Nupur 🙂 🙂
loved.. loved.. loved it Nafi..!!! :-*
Thanks Surabhi :*
this is looking beautiful 🙂
Thanks Poorva 🙂
lovely Nafisa 🙂
would love to wear this look
U shud definitely try 🙂 n thanku!
What a detailed tutorial, Nafisa! Love it. 😀 And you look beautiful.
Thanku so much JW 🙂
awesome girl! applauds! 😀 this is SUCH a detailed and helpful tute! u r really an expert 🙂
Awww thanks so much Aparajita 🙂
you looking soooo elegant and pretty nafisa. guess you should do the same makeup for your own wedding as well. Totally loved it. mwwwaahhh!!
Thanku so much Rati 🙂
But i think i wud go for a more dhin-chak look for myself 😀
wow looks lovely
Thanks Hana 🙂
fab look n tut nafisa 🙂
Thanku Bhumika 🙂
Wooow naf sooo pretty I just love ur last pic .. It’s sooo adorable… Ur tuitorial too is a detailed one quite helpful fr beginners
Wooow naf sooo pretty I just love ur last pic .. It’s sooo adorable… Ur tuitorial too is a detailed one quite helpful fr beginners
♥ :* thanks so much Abeer, glad u liked it 🙂
U r sooooo beautifull nafisa,aur ap kay makeup skills k baray main kya khaeyn g:* SUPERB
Thanku so much Mona! 🙂
I am still awestruck Nafisa 🙂 you look stunning..!!
🙂 Thanks Shilpic! 🙂
great job Nafisa…very nicely detailed, a very helpful review…lovely eye makeup…i soo wanna join a makeup course…
Thanku Misha 🙂 glad u appreciate it! even i would LOVE to join a professional course!! 🙂
Vv nice tute nafisa ….u look gorgeous n UR skin is absolutely flawless… Xoxoxox
Thanku Reema 🙂
n trust me, my skin is not flawless, the foundation hides my acne scars, irregular skin tone etc..n if u look closely u can c the acne scar dents on th cheeks, using a good primer helps hide them a lot 🙂
wow nafisa dats such detailed tutorial.. love it…
n ur lukin totally stunning …
Thanku Sushree 🙂
wow Nafisa.. thats such an subtle yet an elegant look… I totally loved it 🙂 🙂
Thanku so much Amropali 🙂
omg.. beautiful nafisa.. 🙂 love ur tute and way of grooming!! too good..
Thanku Neetu 🙂
beautiful nafisa. 🙂 very pretty.
Thanks Kinjal 🙂
Hey…Nafisa… you are such a beautiful and a pretty girl. :-)…and the make up look has turned out to be sooooo lovely …. :-)me loving the beautiful shades u hav used and the pinky pinky lipppiee tooo… way to go girl.. very very pretty 🙂
Awwww *blush* thanku so much Nidhi 🙂
Lovely tut and u look gorgeous in ur last pic 🙂