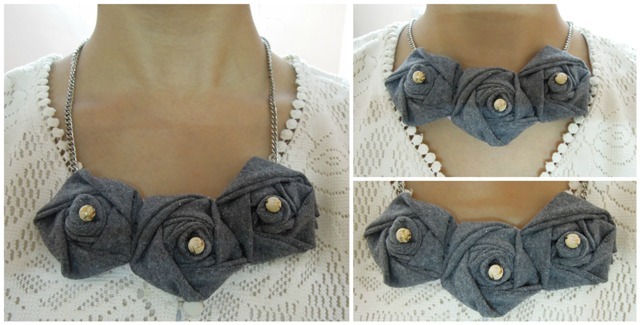
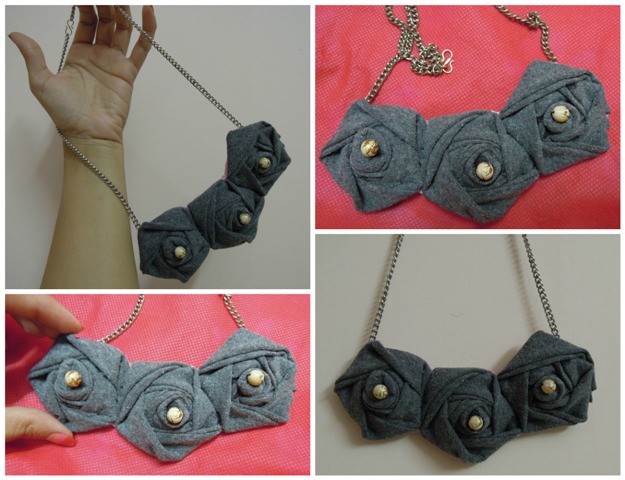
Fabric Rosette Statement Necklace: D-I-Y
Hello Ladies,

First of all a big thanks to all of you for liking my DIYs, it really motivates me 🙂 coming back to today’s tutorial, today we are going to make a statement necklace. I don’t wear statement pieces regularly but I love adding fun pieces in my collection hoping to wear them some day 😛 So when my niece was here I made a fabric flower neck piece for her, outcome was good so I thought why not make one more for myself. For her I made it in in baby pink with few more flowers but for myself I wanted something understated in solid color, so I used grey. You can select any color of your choice. So are you all ready? let’s get started then.
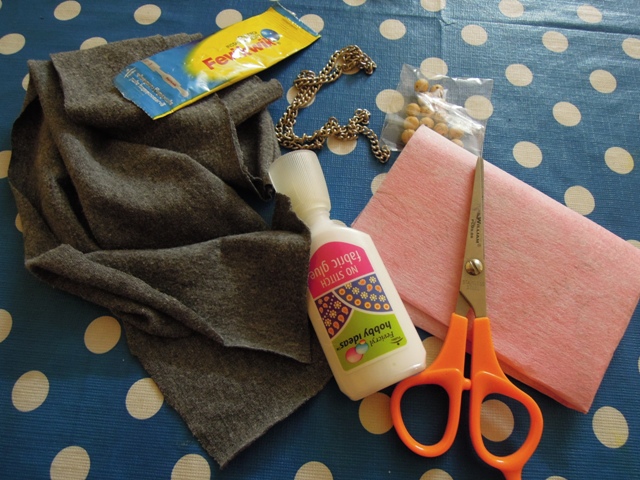
Things we need:
• 2 to 21/2 inch wide 15 inch long fabric strip for each flower.
• Felt or any thick cloth to use as base.
• Chain of desired length (as per the length of necklace you want) or you can use ribbon too if you want.
• Some beads for decoration (optional)
• Scissors, fabric glue or hot glue, feviquic, thread & needle.
Step 1, 2 & 3: Take one strip of the fabric, keep it straight on a flat surface, fold both the raw edges inside towards the center then fold it in half.
Step 4: Make a tight knot at the end of the strip. Make sure you keep your raw edges folded in as you tie your knot. The tighter you make your knot, the better your rosette center will appear.
Step 5: Keep your raw edges folded in as you start your rosette. Hold onto the knot’s tail and bring fabric down as you turn around the center. This will help keep the center nice and tight. Go for two turns then glue it.
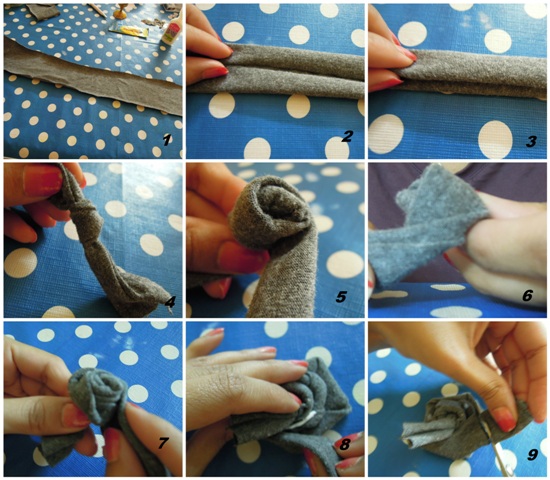
Step 6: now start twisting the fabric from bottom to top towards you as shown in picture and roll towards you. Keep doing this and keep gluing every 2 turns. Keep the center tighter so that your flower wont fall off, and add glue at the bottom so that it wont look ugly at the top.
Step 7: keep twisting and rolling till you reach the end of the fabric strip.
Step 8: glue the fold and paste it at the back.
Step 9: cut out the extra fabric and the fabric tail.
Step 10 & 11: now let your flower dry. Make all the flowers in same way. In my design I am using 3 flowers of same color you can mismatch the color and increase the number of flowers if you want.
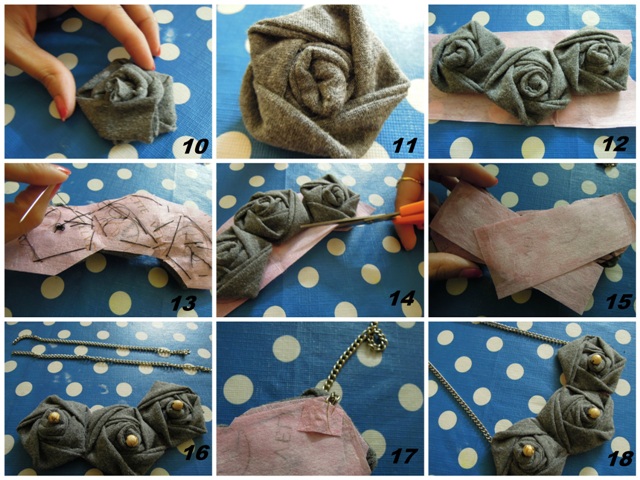
Step 12: When all then flowers are ready then attach them on the felt using glue.
Step 13: to make it stronger you can even sew the flowers on the felt.
Step 14: once done cutout the extra felt, according to the shape of the necklace.
Step 15: for added protection and to give a cleaner look to the back of the necklace, glue another piece felt at back. Then cut out extra.
Step 16: the flower arrangement is done. Glue some beads at the center to beautify them if you wish you can add some more beads of different color and size too.
Step 17: now attach the chain at back of the flowers using feviquick or hot glue. Glue a small piece of felt on top of it to secure it. Let it set for some time.
Step 18: that’s all; your handmade fabric rosette statement necklace is all ready for use.
Go on and flaunt it in different colors and you can try in in prints too…. It looks very nice with plain shirts or blouses. You can even use flowers of different sizes to get different patterns. I have seen this kind of necklace online ranging from $25 to $200, but you can make it on your own for almost free of cost. So let you imagination guide you and make your own fabric rosette statement necklace.
Hope you guys liked this tutorial and will try it too 🙂
PS: attaching a picture of a handmade photo frame I made with my niece which she will gift her parents on their anniversary. I decorated it using quilling.

5 Homemade Skin Lightening Face Masks
Gram Flour Mask with Green Tea – Do It Yourself
Skin Benefits of Yogurt
Homemade Face Pack for Skin Whitening
DIY: How to Make Colourful Button Ring
Customize Your Hair Clip – D-I-Y
Butterflies in My Hair: Do It Yourself
Make Your Own Fluffy Flower Brooch: DIY


You are a great artist Sweta *jai ho* *drool* *woot* i loved the necklace that you made… almost looks like the ones we find in the shops.. great workk… i love flowery necklaces *happy dance* *haan ji*
Thanks Saloni *happydance* happy that you liked
awesome sweta.. *clap* u r an all rounder yaar.. *jai ho* *jalwa* am saving all posts for future neetu.. *happydance* *happydance*
Thanks for the kind words Neetu *thankyou*
And Future Neetu rofl Nice name for Aadya *haan ji*
*clap* *clap* very cute
Thanks Neha *thankyou*
Wow such a pretty and classy neckpiece u hv made!!! *clap*
Loved the photo frame as well. What is the black background on the frame?
Thanks Prerna *thankyou*
That black thing is stone powder which came out of the filter from out old water purifire…
I just did not feel like throwing it so kept it for doing some craft, finally used here 🙂
*happy dance* it’s sooo chic like it a lot
Thanks Abeer… make one for yourself then *pompom* *happydance*
Moderation 🙁
You are so darn talented, Sweta ! I suck at DIYing jewelry (hey, can’t be great at everything, right ) but I would totally buy this! It’s so unique and can dress up any t-shirt ! Super cool !
*thankyou* Devie…. I am happy that you liked it this much…. do try it out yourself too 🙂
Sweta u r indeed very creative..
LOved ur finishing of the necklace
Luks js lyk d ones v find in shops.. *clap*
Tooo gud!!!
*thankyou* Veronica…. I am happy girl now *happydance*
awesome work sweta… *jai ho* *jai ho*
*thankyou* Sahiba
Amazing Sweta I loved it.. and the photo frame is really beautuful.. *clap* *clap*
*thankyou* Thanks Dipti *happydance*
very nice shweta….. *powder*
*thankyou* kantika… try one for yourslef
nice one sweta:) lovely photo frame… *puchhi*
*puchhi* thanks soundrya
You are such a artist. I keep on thinking and you just implement it. *clap* *jai ho*
*thankyou* Neha
Shewta, from where can i buy this chain? I have so many designs in my mind but cannot implement it due unavailability of chain 🙁 🙁
Hey neha… I took out this chain from one of my clutch *haan ji*
then how can we create hooks at the end? I mean how are we going to lock it?
you can creat a hook by foding a wire or use hook from any old chain like I did 🙂
Gr8 DIY n nicely explained *thankyou* for sharing dat frame pic as my bf is g0ing dubai 4 1yr so i wz thnkng 2mek sumthng dat he wil kp wth him so thanku 4giving me dat idea
Thanks Anita… do try it out
hats off to you, *jai ho* sweta! you are so talented and creative!!!! 🙂 i wish i were half as creative as u! 😛
*thankyou* swarnali… try it gal you can make it too *haan ji*
all i can do this for u *jai ho* *jai ho* *jai ho* *jai ho* *jai ho*
so awesome and talented u are Sweta .. amazing work *clap* *clap*
*thankyou* Nats…. you try it out girls it is easy 🙂
u r so talented… *jai ho*
*thankyou* *thankyou* Sangeeta
*woot* *woot* Sweta..you are amazing.. *clap* *clap*
*puchhi* Thanks Esha *thankyou*
Fabulous DIY! looks so professional! n the fotoframe is soo sweet n glittery!! 🙂
*thankyou* Sukanya *thankyou*
Its lovely sweta
*thankyou* Neha
Wah Sweta Wah! 😛 AWESOME THIS IS… EVEN I DONT WEAR THEM MUCH BUT LOVE KEEPING THEM 🙂 *clap* *clap*
🙂 🙂 🙂 samepinch then Vidhi
So creative Shweta. *hifive*
*thankyou* Nirmala 🙂
the necklace turned out to be so unique and stunning shweta. :)) and the photo frame is just beautiful. Love how creative you are. *hunterwali* *hunterwali*
*thankyou* Rati 🙂
but why are you doing *hunterwali* to me *scared*
What are the black black particles on the photo frame.. can u tell us how u made it, its was soo *clap* *clap*
Thanks Neha 🙂
that black black particle is some stone powder used in filter of water purifire… I got it from my old filter… I think some craft stores sell such stone powder too in different colours… used long long back in school once, just try 🙂
Shweta your work is simply amazing *clap*
Love the photo frame and the neck piece.. *happy dance*
too good , very creative 🙂
Thanks Nidhi *thankyou*
OMG sooooper doooper ur such an artist.. no words to describe… will definately try it…. *clap* *happydance* *happy dance* *happy dance* *happy dance*
Thanks Deepika *thankyou*