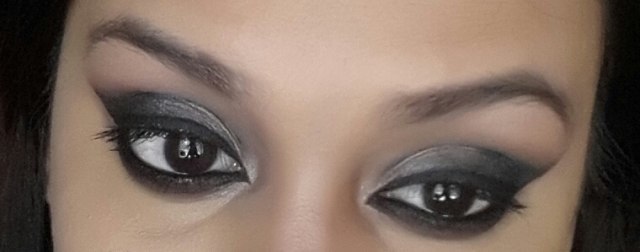
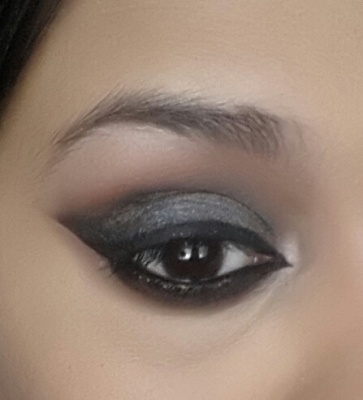
India may or may not get to enjoy Fifty Shades of Grey in theatres anytime soon but that doesn’t mean we can’t be inspired from it – in the makeup department only though! This look is merely inspired from the title; it is not a look from the film. And I used the Urban Decay Naked Palette (Original) to create this look. Ah! How apt does that palette sound for this film! Let’s get started with this easy to create grey smokey smouldering look.

Products Used:
- Primarily, for this look the Urban Decay Naked Palette was used. It has all the shades needed for any neutral smokey eye.
- Bobbi Brown Gel Liner – Black Ink – as base for the black shade in the outer corners and as the liner too.
- Milani Baked Blush in Luminoso as blush and also as crease color diffuser.
- Maybelline Colossal Volume Express Mascara
- MAC Select Cover Up Concealer
- MAC Studio Fix Fluid Foundation
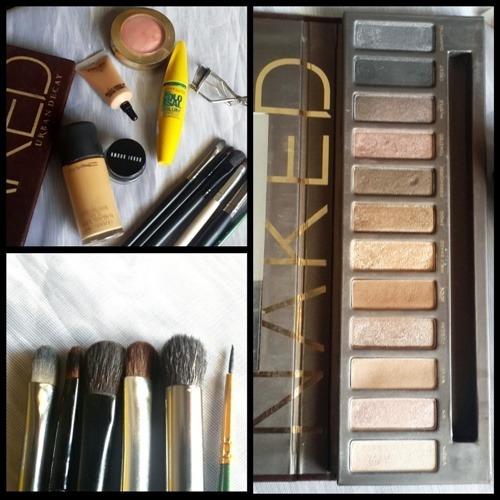
Brushes Used:
It really hardly ever matters what brushes exactly were used, as in what brands. What matters is what type of brushes were used.
- A flat synthetic brush – to pack on colors on the lid.
- Fluffy brushes – to blend out colors in the crease and also to apply highlight color on the brow bone.
- Pointed fluffy brush – to apply color precisely in outer V.
- Fluffier brush – to further diffuse the crease colors.
- A thin Liner brush – for applying a wing liner.
Step-by-Step Procedure
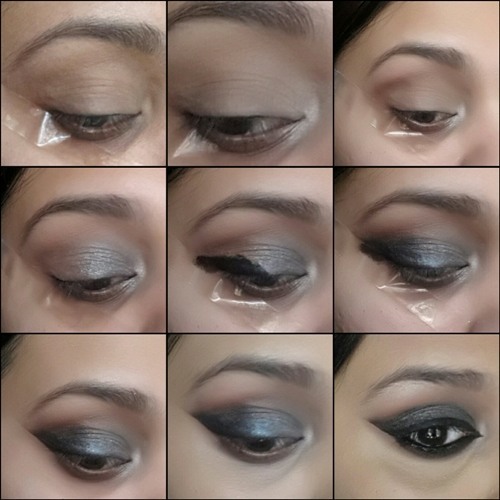
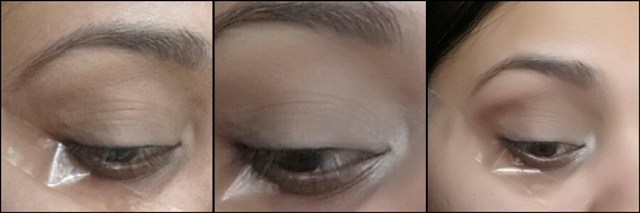
Step 1 :
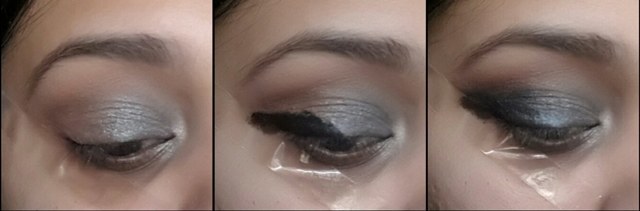
Use a scotch tape placed at an angle just below the lower lashline, pointing up towards the end of the brow tail. It is very important to stick the piece of tape on your hand and remove it gently and repeat the procedure at least 1 more time to remove the excess adhesive so that it is suitable for the sensitive eye area.
Step 2
Next I applied a bit of my concealer over the eye with some face powder over it, to act as a base/primer. In the inner corner, I also placed a light shimmery bone color as a highlight – Virgin from the palette.
Step 3
Using a pointed fluffy brush I applied Naked, the lighter matte brown on the inner crease and Buck, the darker matte brown in the outer crease. Then I used a fluffier clean brush to blend the colors out in the crease.
Step 4
Then I applied the grey Gunmetal shade in the inner half of the lid.
Step 5
Next, I used my black gel liner and created a thick wing in the outer corner, this needn’t be neat as the color will be blended out on the inner side and the scotch tape in the outer corner will ensure a crisp line.
Step 6
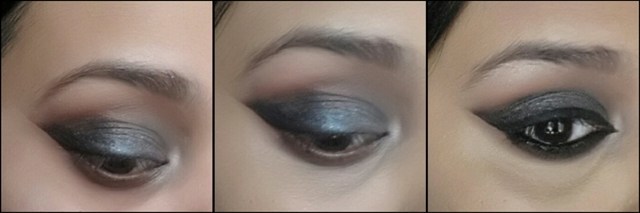
After blending out the black gel, I applied Creep, the black in the palette, over it to set it and blended it with the grey in the inner corner. Also I went back to the brown colors and applied them in the crease again as blending the black and grey out can take away the browns. So go back and forth and reapply colors to increase the intensity as and when required.
Step 7
I then removed the tape, to reveal that crisp edge. I then took the blush I was going to apply on my cheeks and used a very fluffy brush to apply to above the crease, diffusing the colors in the crease further. Using the same blush color really ties up the whole LOTD together.
Step 8
Then I went back with each color and intensified the colors, especially the blacks and grey. All the blending we do can make the colors lose their intensity. Also, I applied concealer, suing it to clean up around the eye.
Step 9
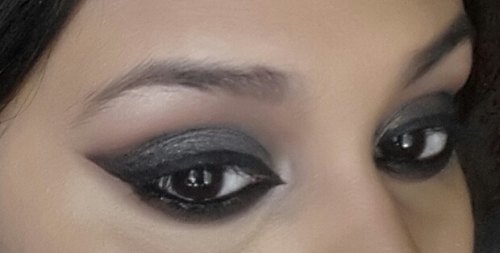
In the last step, I applied black gel liner, kajal, mascara and brow bone highlighter – Virgin shade.
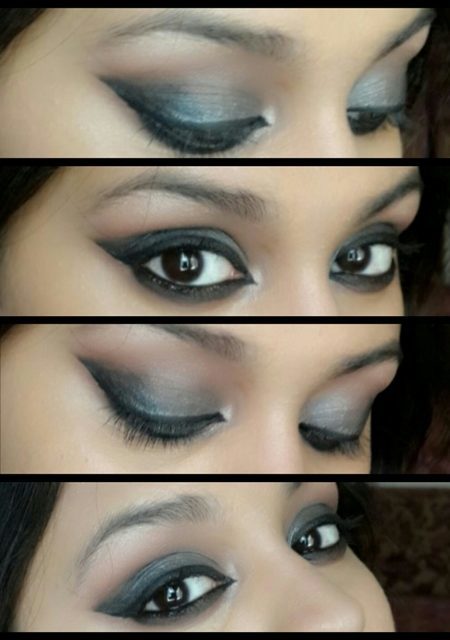
This finished the look for me; I applied my foundation etc. and paired it with a light pinkish-brown lip.
One important point to note with such shades – blacks, greys, browns – is that the colors can look very muddy if over blended. To ensure that the colors look neat is to blend the colors with small strokes and blend them out in only one direction away from the color placed beside it. If a “windshield wiper” motion is used back and forth then it causes over-blending and the colors lose their individuality. I hope that made some sense!
I sincerely pray for a day when better sense prevails amongst our countrymen. Maybe we should concentrate less on what we hear or see on screens and pay more attention to what happens to us in our daily lives. Anyways, this is a discussion far more serious and deserving of a whole new post!
I hope this tutorial helped and Happy Makeuping!
Silver Smokey Eye Makeup Tutorial
Smokey Eye: Brown Black Smokey Eye Tutorial
Golden Smokey Eye Makeup Tutorial
Shimmery Grey Black Smokey Eye Makeup Tutorial
Festive Reverse Smokey Eye Makeup Tutorial
Black Smokey Eye Tutorial
Easiest Black Smokey Eye Tutorial
Day To Night Soft Smokey Eye Makeup Tutorial
Urban Decay Naked Palette Review, Swatches
Urban Decay NAKED2 Eyeshadow Palette Review
Urban Decay Naked3 Eyeshadow Palette Review, Swatches, Eye Makeup Looks
Urban Decay Naked Flushed Palette in Naked Review


what gorgeoeeeus eye makeup nafisa. always look forward to them. Guess both of us decided to show some love to our UD palettes at the same time!! 🙂
your eyes look STUNNINGGG!!!
Hehehehehe yayyy for the shared love! 🙂
Thank you soooooooo much :* means the world!
Nafisa this is super hot 😀
Thank you soo much Jasmine! 🙂
Your eyes look gorgeous!! How well you explained each step Nafisa!!!
Juhi, I am glad you could follow it 🙂 Thank you!
Wow! I am so in love with your eyes now Nafisa. 😀
Thank you Shikha 🙂 *blushing*
Stunning Nafisa! !!!love it
Thank you Mimosa! 🙂
Woweeee… Stunning
Thank you Arpita! 🙂
This is soo much fun.. I am going to try this one very soon..Your eyes look hot..keep getting us such posts..
Do share piccys when you try on the forum! :))
Thank you! 🙂 i intend too 😀
Fantastic post Nafisa.. !! You have such gorgeous and captivating eyes mashaAllah..!!
Awwww! Thank you so much Neha!! 🙂
you have beautiful eyes nafisa , and your eyes look soo hottt:) 🙂 and the tutorial was very nicely explained 🙂
Absolutely stunning!