Hi All, Please Welcome Meg as our third contestant in our ‘IMBB $300 International Eye Makeup Queen Contest‘
A big hello to everyone on IMBB,

This is my first entry for the eye makeup contest & I am so psyched about it. With my penchant to create different looks, which I won’t be saying I am flawless at it because I am still in the process of learning, this is the great platform to show it.
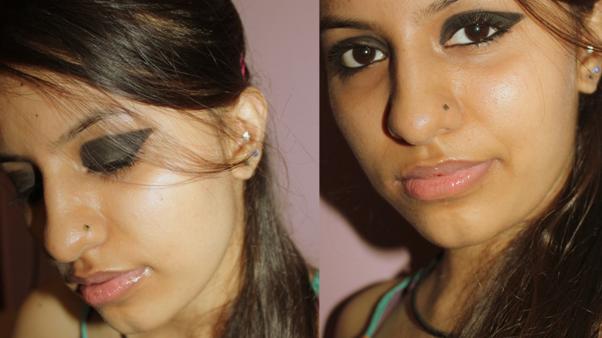
I am trying to make this one more of a tutorial rather than creating something inimitable and beyond limits. Hope to do one soon. Hence, this one just states some nitty gritty particulars of what I have learned and experienced with practice and time. But before that I would like to say something I thought I must say and perhaps many of you feel that too.
The only part of a human being that speaks the truth is eyes. We know one can judge a person and know everything about a person just by looking into their eyes and by that I don’t mean falling in love with someone looking deep in their eyes, but it literally means understanding the other person, when they are not good at expressing themselves, only eyes will tell you what they really mean to say.
What I have learnt is, I don’t know if you all feel the same, eyes If not done in the right manner can give a wrong impression to the onlooker. So, one should always keep in mind what they are trying to achieve actually represents what they truly are and not trying to fake someone else. People with heavily kohl covered eyes are considered to be discreet, reserved and aloof in nature {aka gothic} and this is somewhat expresses me as well. I have noticed if you keep your eyes natural and graceful without any makeup on, you tend to look pleasant, sweet and innocent and yes it is indeed true. I have faced this kind of attention too when I have left my eyes without any kohl or liner, but clean, thin lined extremely close to the upper lash line and voila! You become a warm naive little soul. Lol, this may sound funny, however it is a fact. Subtle is the way to be. I know you will agree with me on this.

Nevertheless, I do love to experiment with my eyes and especially creating different types of looks mostly using just eyeliner. I am not fond of colours though, but yes, I agree that sometimes use of proper colours opens up your eyes. I personally like to experiment more with blacks, preferably a super intense black. You can imagine how wicked I am or can look, again thinking of the impression one’s eyes can give. He he.
Enough said, let me start with the look.
A beginner’s guide by a beginner to a trouble-free everyday striking eye makeup
I would like to give some random tips which might be helpful to those who are still figuring out how to get it right, which I have leaned so far.
1. Whether you have childlike eyes or are round-eyed, wide-eyed, dewy-eyed, narrow-eyed, keeping them bare, sans makeup, will always make them appear attractive. However, one can always go for a concealer to conceal some flaws or as I said above, closely lining the upper eyelashes works best. Additionally, thin line around the lash makes the lashes appear thicker.
2. To create a winged eyeliner look, one can use a tape at the corner of eyes to help get evenly winged lines.
3. White eyeliner/eye pencil on waterline helps open up the eyes, also does the same around the tear duct area and brow bone.
4. Use of colours that co-ordinate with your eye colour, helps accentuate the eyes. Colours like blue used as mascara brightens up the eyes.
5. Always use less amount of product in the beginning while lining your eyes to get a better idea of how to move forward and slowly build up.
6. To get a winged/cat-eye eyeliner, always try to line your eyes starting from inside working out halfway to the middle of the eyes and then tilting it upwards from the middle extending to the outer corner of the eyes.
7. Use a thick card like a visiting card or tag for the ideal application of mascara. I will show you how in the tutorial below.
8. Use a Q tip/ Ear bud to clean off excess or any imperfections. One can also use a tissue held at the under eye area while applying eye shadow or powder to prevent fall out over face.
9. For added effect to your lashes, heat the curler under a blow dryer for a couple of seconds. But be careful to test the curler before applying to lashes because this might burn the lashes. {who would want that to happen!!}
Hope these tips are helpful to you as much as they are to me. 🙂
Moving forward to my first entry;
Achieving maximum with minimum
In my first entry I am trying to keep it straightforward yet a little dramatic with less use of products.
Products used:
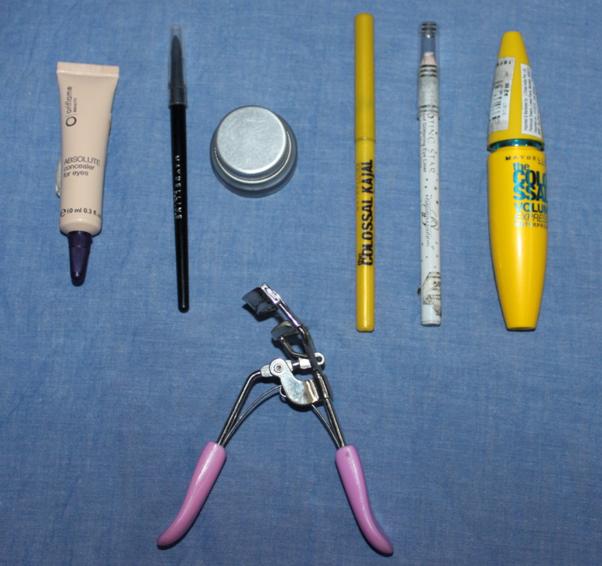
• Maybelline Colossal Kajal
• Maybelline gel eye liner with brush
• Oriflame Absolute concealer for eyes or any thick moisturiser (to prime the lids)
• Maybelline Colossal Mascara
• Eye lash curler
• Diana of London white shimmer eye pencil
• Non adhesive tape or a normal tape (optional for pros)
• A small piece of thick card (optional for pros)
Step 1:
PREP

Prep your eyes with a concealer and primer. I am using the oriflame concealer both under eye as a concealer and also to prime the lids.
Step 2:
LINE
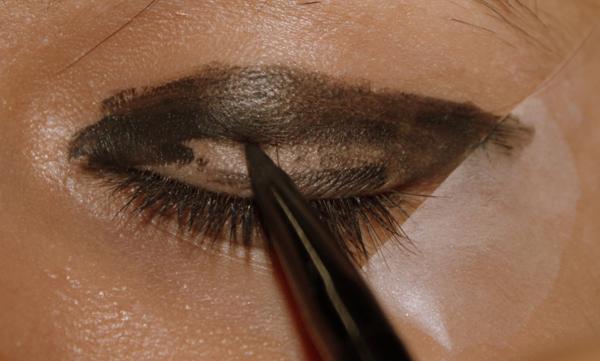
Next up, take a small piece of tape, if it is adhesive then pat it over a few times so it loses its stickiness. Now put this diagonally at the corner of your eyes to help in creating the shape of the liner. With the help of the brush, apply gel eyeliner starting from the inner corner working around the crease to the corner of the eyes over the tape and fill up the entire area. Don’t worry if it is a bit messy because a stiff liner would also look weird.
Step 3:
FILL
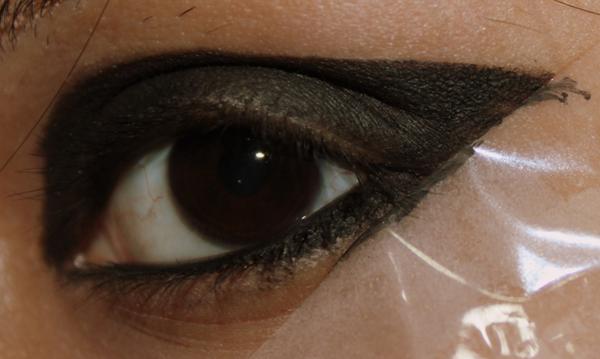
Now fill up the waterline with kajal both upper and lower waterline, in the shape corresponding to the wing created.
Step 4:
HIGHLIGHT
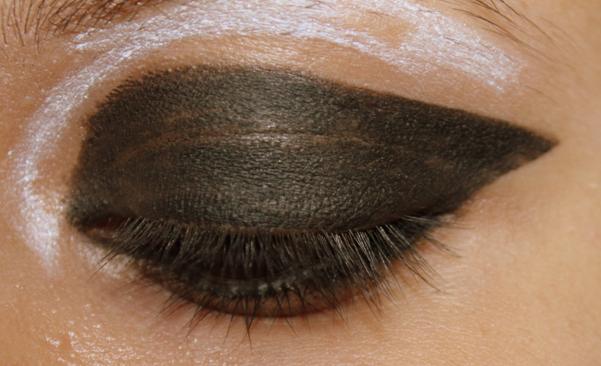
Now spread over the remaining area below brow bone, above lids and around the tear duct with white pencil carefully not messing up the liner {Some might like to start off with the white liner and then fill up the black eyeliner, but I personally like it this way. Also, If your skin is dry, the liner might tend to crack up a little so for that you can also apply a black eye shadow over it. Just spread it evenly}.
Step 5:
CURL AND MASCARA
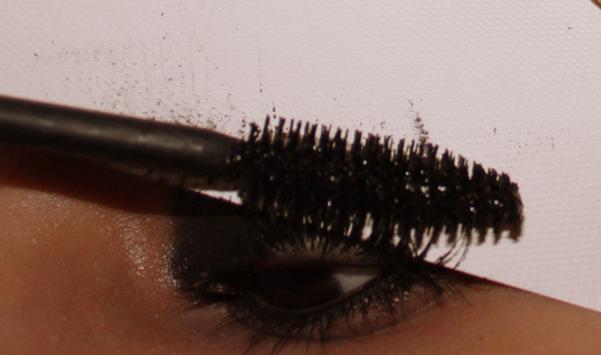
Curl your lashes and finish off with black mascara {For a more better application one can use a visiting card and then apply mascara} on both lower and upper lashes. Place the wand of your mascara brush at the bottom of lashes and wiggle back and forth.
Final look:

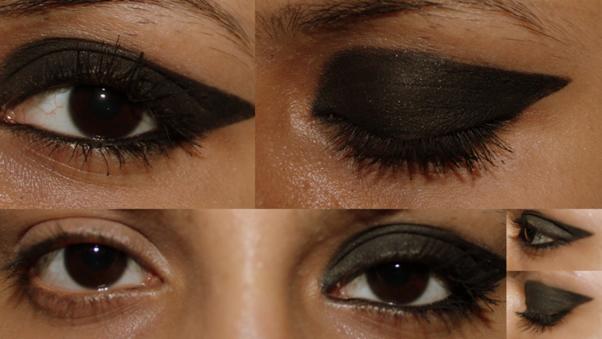
I also did a curved wing tip look {something similar to the one above} awhile back for an evening party {below}:

Hope this was informative and that you all loved this look.
Last but not the least, with respect to eye makeup, I would like to say one should always keep in mind, “If not done in the right way, one might end up giving a wrong impression”. And I apologise for so much content. I never wanted to bore you with details but just wanted to share my know-how. However, I will be careful now onwards. 😉
Use the Buttons Below to Vote for Meg and Make her Win!
Also Read:
Announcing! ‘IMBB $300 International Eye Makeup Queen Contest’
IMBB $300 International Eye Makeup Queen Contest: Entry 1
IMBB $300 International Eye Makeup Queen Contest: Entry 2



I lovved both the looks Meg… And a lot of people swear by the tape trick!!!! Well done and all the best!!! :thumbsup: :thumbsup: :thumbsup: :thumbsup:
wow :thumbsup: :thumbsup: :thumbsup: Meg,u made it look so simple to do.this looks suits u very well :makeup: :makeup: :makeup: :love: :love: :pompom: :jalwa:
i like i like this eye look……… :clap: :yes:
great look…simple and easyyy :manicure: :manicure: :manicure: :manicure: :manicure:
Nice look Meg…you made it look so easy 🙂
loved the way u did the lips with the eye!
good work meg! :thumbsup:
Wow! :clap: :clap: :clap: Very nice look Meg! I cant wait to try this!!!!
Excellent work Meg :yes:
Lovely, very dramatic!
:yes: Nice look Meg..i love the eye lip combo u did :whistle: :whistle:
looks cool gal!
WOOT WOOT….AWSOME U LOOK HAWT GURL……Certainly agree with u about impressions and eye makeup actually just in general makeup …..Loved the black eye look im a complete black smokey eye person…..
I loved d winged liner look…suits u nicely… :yes:
u hav done it really well meg, all d best :thumbsup: :thumbsup: :thumbsup:
last pic is superb !!
Hey Meg, u look supper cool :yes: . And thanks a million for so many wonderful tips, will keep in mind while doing eye makeup next.
Very good!!! loved both the looks!
Thanks a bunch all of you! I am so glad that y’all liked it.
Thanks again!
xxxo
Absolutely lovely Meg!! 🙂 🙂
Thanks dear. Appreciate it. 🙂
:puchhi:
woww…this looks gothic…i love it :heart: :yahoo:
Thanks Bidisha.. 🙂