Make Your Own Nail Polish Remover: Do It Yourself
Hello everyone,

Today, I am sharing an easy but fun DIY with you all. I hope you remember Rati’s review for Colorbar Ultimate Nail Enamel Remover and recently Fahveen’s Sally Hansen Nail Polish Remover.

Both the removers are very different in packaging and in functionality than the normal nail polish remover we use with cotton. Somehow, this concept appealed to me so much and I decided to make one for me. It is really easy to make and is so fun to use, so here I am sharing with you how you can make one on your own.
These are the ingredients needed:
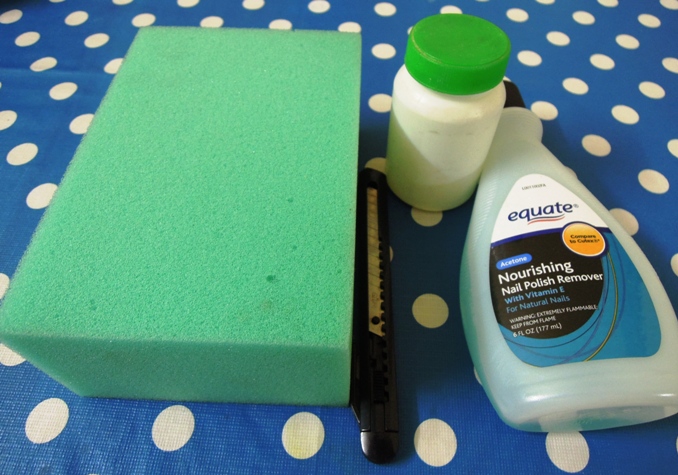
- Normal cleaning sponge.
- Your favourite nail polish remover.
- Hobby knife.
- Clean container.
Step-by-Step Procedure:
Step 1: Cut the sponge as per your container size.
Step 2: On the top side of it, make a mark as shown in the picture with the help of a pen or pencil.
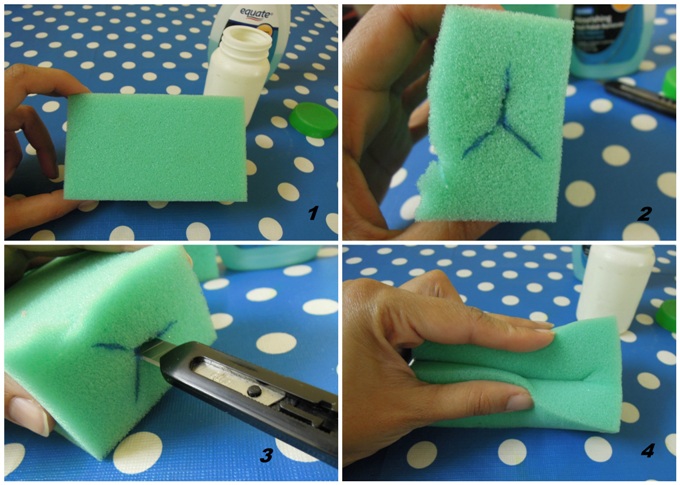
Step 3: Now, using the hobby knife, cut in depth along the mark.
Step 4: Roll the sponge lengthwise to put it inside the container.
Step 5: Slowly rotate and insert the sponge inside the container.
Step 6: After inserting, it should look like this, the cut portion should be on top.
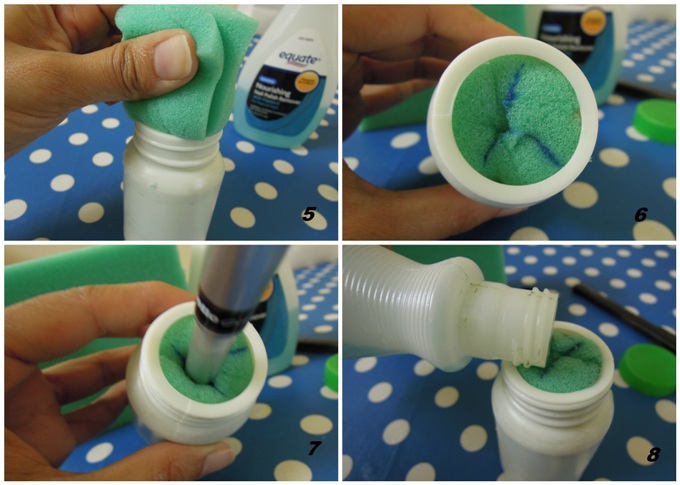
Step 7: Insert a pen/pencil in the cut opening and move it up and down to widen the gap and create a permanent one.
Step 8: Finally, put your favourite nail polish remover liquid in the container from the opening created in sponge. Put it slowly, giving sponge time to absorb the liquid.

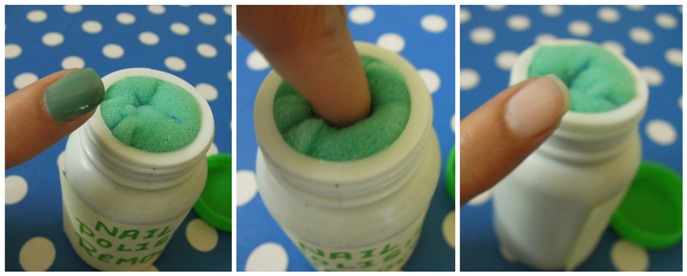
That’s all your own nail polish remover is ready. This is so convenient to carry around and you don’t need to worry about carrying cottons along with the remover liquid. To do some beautification, you can put some sticker on the container and make it as funky as you please.
Now, let’s see how it works. Just dip your finger in the sponge from the opening and rotate it 2-3 times and voila your nails are clean.
Super easy and fun to use, I am going to keep it with me in my bag whenever I travel and plan to make some for my sister and SIL also.
I hope you all like this DIY and will try it too 🙂
How To Make Ginger Infused Skin Nourishment Pack: DIY
Aroma Magic Almond Nourishing Cream
Chanel Precision Hydramax + Active Nutrition Nourishing Cream
Fab India Coral Glow Face Pack
Easy Homemade Face Packs for Dry and Oily Skin
Anti Aging Homemade Face Pack (With Photos)
Biotique Pistachio Ageless Nourishing & Revitalizing Face Pack
Lotus Herbals Face Pack Review: Teatreeclear,Claywhite, Marinyouth
10 Tips for Glowing Skin from Kitchen Shelf
Homemade Turmeric Face Pack for Skin
Aroma Magic Mineral Face Pack Detoxifying Mask
Jovees Anti Tan and Clarifying Herbal Face Pack
Homemade Face Pack for Skin Whitening
Dhathri Fairness Face Pack
Aroma Magic Calamine Face Pack Acne Skin
Everyuth Home Facial- Papaya Face Pack
Olay Age Protect Anti-Ageing Cream
Garnier Wrinkle Lift Anti-Ageing Cream
Everyuth Natural Cucumber Face Pack
Biotique Milk Protein Face Pack
Anti Aging Homemade Face Pack (With Photos)
Freeman Clay Mask with Avocado and Oatmeal
Lotus Herbals Skin Polisher : Kiwi & Grapes


superb 🙂
Thanks Mily 🙂
wow!!!!! amazing! 😀 can’t thank u enough for this! <3 😀
Thanks Aparajita, do try this one 🙂
Great one.. Easy and fun 🙂
Thanks Shilpa 🙂
very cool!
and ur nails are to die for!
Thanks Neha !!
superb 🙂 tooo goooodddddddddddd 😉
Thanks Prachi 🙂
Sweta..
The BESTEST DIY ever! Loved it. Keep posting more of them.
Thank you Surbhi ji 🙂
good one.. 🙂
Thanks Rama… try it out gal 🙂
Thanks Anu…. 🙂
and your pet ate sponge, really… hehehe 🙂
buy one more, I got this big piece for just 10rs
Sure Anu 🙂
Way to go.. awesome DIY sweta.. 🙂
Thanka Esha 🙂
woww… you have done an awesome job… 🙂 i am definitely gonna do this…thanks.. 🙂
Thanks Sahiba, do try it out 🙂
Awesome DIY Sweta
Thanks Nidhi
Amazing sweta..so innovative..easy too:)
Thanks Soundarya 🙂
That so cool.. such an easy peasy DIY 😀
*Thats
Thanks Ritika 🙂
Try it out Ritika 🙂
Super creative girl 🙂 ..loved it…till core 🙂
thanks swats 🙂 try it
Sweta, u r so inspiring..
May it be ethnic clothes, eye makeup tutorials or DIY’s, u always rock!!
hey Amisha,
Thanks aton girls…. I am so happy that you like them 🙂
hey this is cool….and can be refilled with remover as and when required….
Very true Rashmita,
and when the sponge gets super dirty we can replace that too 🙂 yeee
Superb, wud love make one 😉
Sure TA, make one and tell us how u liked it 🙂
Super Sweta, I will make one for myself 🙂
Sure Jomol, I hope you will love it 🙂
super ..duper idea Sweta…grt going..sure gonna try this…cool idea.
Thanks Melissa 🙂
Hi… I have also made this one.. after seeing the super expensive Colorbar makeup remover which is based on the same concept.. the best part is that this is so travel friendly… i love it…
Oh colour bar has makeup remover also like this…. thats lovely 🙂
Yes.. they do.. ive seen it at Beauty Center in Mum abt 4-5 months bck… it was priced at approx Rs. 250+… I loved it then…but dint buy it coz I thght it was too expensive for a makeup remover.. I kept staring at it to find out the concept and the SA thought I was all mad luking at a simple makeup remover for soooo long… it was hilarious… little did she know I will try it out at home.. lol…
wow, i was thinking to buy colorbar nailpolish remover as it was easy to carry with you but that was bit costly now i don’t need to spend too much for nailpolish remover. thanks for such a useful post.
glad you like it Divya… try this out 🙂
That is such a smart idea ! 🙂 i’m going to try it !!
Thanks Smita 🙂
I have a doubt thought, do you cut that ‘Y’ mark on the sponge.. on the length side, or breadth side or height side? I’m a li’l confused.
it should cut in depthe. that is just put the knife on all 3 lines of Y mark one by one and make cut depth wise. your knife should showly go inside the sponge.
I hope I am clear now… 🙂
yup, thanks 🙂
Awesome DIY! Can’t wait to try this one out.. although can you tell me how long will this last? Won’t it go dry soon?
it won’t go try soon swati as you will keep the cap closed. moreover sponge hepls the acetone evoparate slower…. and whenever it dries out jut pour some more acetone and you are good to go 🙂
what if it vl evaporate… ??
if you will keep the cap open even the liquid nail polish remover evaporates cherry…. so till you keep the cap closed after use it will be fine…
yup dat i knw ummmm u r ryt 🙂
:O :O awesome!!!!
thanks gargi 🙂
wowww rely creative haaan … 😉
thanks Nupur… try it 🙂
easy to make, carry and use…great for someone like me who lazy around when it comes to removing nail polish…thanks much for such a brilliant idea!!
Thanks Geetanjali 🙂
damn cool!!!
and so pretty nails! 🙂
Thanks shrreya 🙂
supeb shweta.. wt an idea sir jee.. 😀 supercool diy shweta.. am definitely making it abhi k abhi.. cant wait for dis easy nail polish remover wow.. kya dimaag h shweta awesome!
Thanks Neetu,
Hope you made it and liked it too 🙂
i‘ll make one for myself too. 😀 great diy. love your post
Thanks Val 🙂
Awesome…..loved it….gonna try this now
Yes pallavi try this out 🙂
Cool!
Try it rene 🙂