All about Eye Liner
The purpose of eye liner is to define the boundaries of the eyes. The precise placement can determine whether the eyes look larger or smaller. Eyeliner can make even the smallest eyes appear larger. It can create drama and balance. However, eye liner isn’t appropriate for all occasions. Applying it correctly is key; you don’t want the line to be too dark, harsh and obvious or you risk looking overdone. Whether you choose a soft line or a dramatic stroke, you can enhance the windows to your soul by spending just a few minutes in front of a mirror with an eyeliner pencil.

Types of Eyeliner:
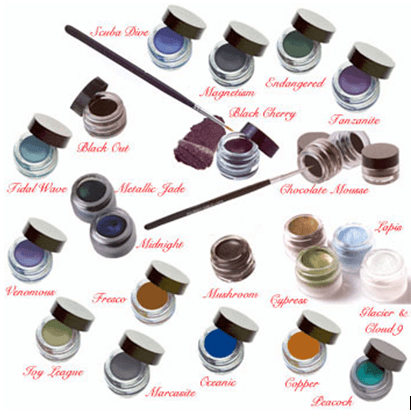
• Liquid Eyeliner
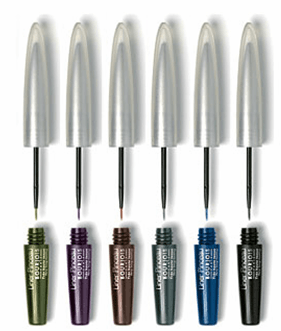
Image Source
Pencil Eyeliner
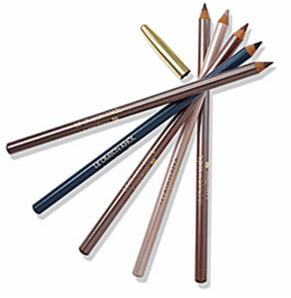
Image Source

Image Source
Pencils that must be sharpened or twist-up versions that can be “re-sharpened” with the twist of the applicator. Liquid and Gel eye liner typically comes with its own applicator brush enabling you to create very thin lines or bolder ones as desired.
Let’s see the looks we can create with the eyeliner.
1. For Defining the Eyes:
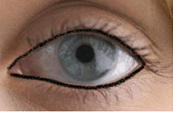
Use the liner to fine line the edges of the top and lower lids in order to frame the eyes. It will look good on the women who have light and soft eyes and brows.
2. For Balancing the Eyes:
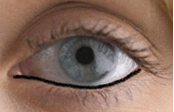
Use the liner to apply a fine line along the edge of the lower lid so that the lower lashes appear thicker and balance with the lashes along the upper lid. Good for the women with spares lower lashes.
3. For Extending the Eyes:
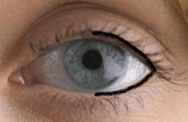
Apply the liner from the center point of the upper and lower lids to the outer corners of the eyes. This application technique draws focus to the outside of the eyes and helps to make the eyes appear wider. Will look good on the women whose eyes are closely set, so it gives the illusion that the eyes are wide.
4. For Narrowing the Eyes:
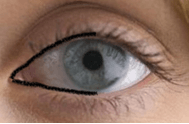
Apply eyeliner to the top and lower lids from the center to the inner corner. For the women whose eyes are very wide-set eyes, so it will make the eyes appear closer together.
How to apply liquid eyeliner
A typical way to apply liquid eyeliner is to line eye from the inside of the lashes outward in one big sweep. You can also line the eye from the middle of the lash line outward, then finish the line from the inner corner of the eye to the middle.
Eyeliner Application
Most people use an eyeliner pencil because they think is will be easier, but with a bit of practice, liquid eyeliner can be used successfully too, so that either way you end up with a nice straight line.
Before you start applying:
- Wash the eyes properly before applying eyeliner.
- Apply all other eye products like concealer, primer, eye shadow before applying eyeliner.
- If you applying liquid eye liner then you can keep cotton balls ready with you to wipe the mistakes.
- Make sure that while applying eyeliner the place is properly lighted and the mirror is also crystal clear so that you can very well see the shape of your eyes.
Eyeliner using Pencil
- Before using pencil liner you can test it on your hand whether it’s gliding softly. And again you will come to know whether the line pencil is drawing is thin or thick and based on your requirement you can sharp it.
- Hold the eye pencil in your hand as if you are holding pen or pencil. And stretch the eye from the outer corner using your other hand.
- Start drawing line from the outer corner of your eye and try to draw liner as close to your upper lash line as possible. No need to apply the whole line in single stroke. You can apply the liner in the short strokes.
- This will draw a thin line close to your upper eye lash line. So if you want thick line then you can draw one more line over that
Eyeliner using Liquid Eye Liner
- Before applying liquid liner shake the bottle well. For liquid liner you can start drawing line from the inner corner of eyes.
- Keep your eye half open. Tilt your head back and look at the mirror. It will allow you to get very close to your eyelash line. Get the liner on the applicator and hold it in one hand and with the other hand stretch the eye from outer corner. Move the wet brush gently and draw the line on your upper lids very close to your upper lash line, following natural curve of your eye lids. No need to apply the whole line in single stroke. You can apply the liner in the short strokes.
- After applying complete line allow it to dry before opening your eye or the color may transfer into the crease of your eye.
- While drawing the line, you can make it gradually thicker at the out corner of your lashes. And if you want very thick line then you can build the line gradually very carefully
I hope this article will helpful to all the beauties of IMBB.
Lots of Love and Kisses..
Ami 🙂





Nice article ami!!! V helpful tips
Thank you so much HD.. 🙂
hey hw r these gel liners of studio direct that u have shown here above ..?where can we get them?
Hi Shilpa,
I have downloaded this pic from the Studio Direct site… there is link of the site below the image… there you can buy these products online…
HEy very very useful stuff Ami….
I am sure everybody will find this to be helpful… :-)) :-))
.-= Mrunmayee´s last blog ..Grand giveaway at IMBB!!!! =-.
Thanks a lot Mrun… Glad that you liked it… 🙂 🙂
Very useful tips. Thank you for sharing 🙂
Thank u so much Insiya… 🙂
Awesome…finally I know how to line my eyes ,thks to u…thk u so much!!!
Thank you so much Amritha… 🙂
Wow… Very informative post.. I should trying your tip for extending my eyes 🙂
Thanks a lot Priya… 🙂
Please try and share ur experience with us… thanks sweetie :-*
Really useful for a person like me who is still struggling with liquid liners 😉 btw the last topic is for liquid or gel liners? as you already mentioned ‘How to apply liquid liners?’ and again this one says ‘Eyeliners using liquid liners’???
Thanks Aarathi….
yeah the last one is for liquid liners but the same steps you can follow for the gel liners… they are same… sorry i could have said “Eyeliner using Liquid Eye Liner or Gel Eye line” instead of “Eyeliner using Liquid Eye Liner”….
the only change is: since the gel is thick it wil not get transfer into crease but still you will have to allow it to set after applying…
okie.. 🙂
Wow. Thanks Ami 🙂
Ami,
Really good tips..especially how to use eyeliner to get different effects…great 🙂
.-= Maddy´s last blog ..Swatch-Review – MAC Prunella =-.
Thanks a lot Maddy…. its very motivating when you gals say “Very useful topic”…
:-))
How do you apply a liquid liner to the lower lash area? I always mess it up!
.-= anks´s last blog ..Writing Vs Therapy =-.
Hi, Thnaks for sharing the tips.
I usually struggle alot while applying liquid eye liner as i mess it up with my lashes and then they smudge on my under eye.Pls suggest how can i do better?
Also, because of this i use Eye pencils as i find them easier, but i am able to draw them little bit broad, how should i apply for getting a fine liner
Thanks! Helped so much! :-* xD