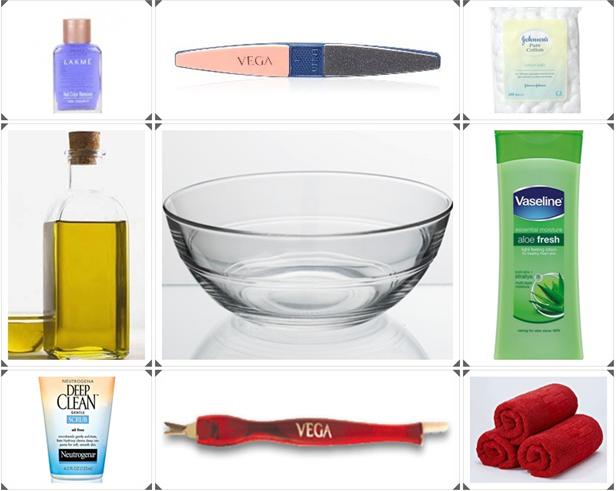
We all prefer to go to beauty salons for our bi-monthly or monthly pedicure as it can be a tedious and less convenient job to give oneself a pedicure at home. Agreed! But many a times we forget to take care of our hands. We do consider pedicure important enough for a bi-monthly /monthly affair but we do tend to postpone getting a manicure done. One of the reasons of not getting a manicure done is cost. Today I am going to show you a 10 minutes procedure of doing a “Manicure Treatment” at home every week (or twice a week) and it will give you amazing results. Here is the list of things you will need:

1. A bowl with warm water (big enough to dip your hands)
2. Olive oil (Preferably Extra Virgin Olive Oil)
3. Face/Body Scrub
4. Nail Polish Remover and Cotton
5. Nail Filer and Nail Cutter
6. Hand Towel
7. Cuticle Trimmer and pusher (optional)
8. Moisturizer
Before I start with the process, I would like to tell you the reasons for using Olive Oil:
1. Olive oil has powerful hydrating abilities and anti-aging properties. Olive oil is a versatile all-natural beauty ingredient that’s affordable, especially when compared to conventional beauty products.
2. Olive oil will help smooth chapped, dry hands. It helps you to get silky soft hands.
3. Olive oil softens cuticles and strengthens brittle nails. Cuticles stay plump and moist, and nails respond with a natural shine.
Now let’s get started with the procedure:
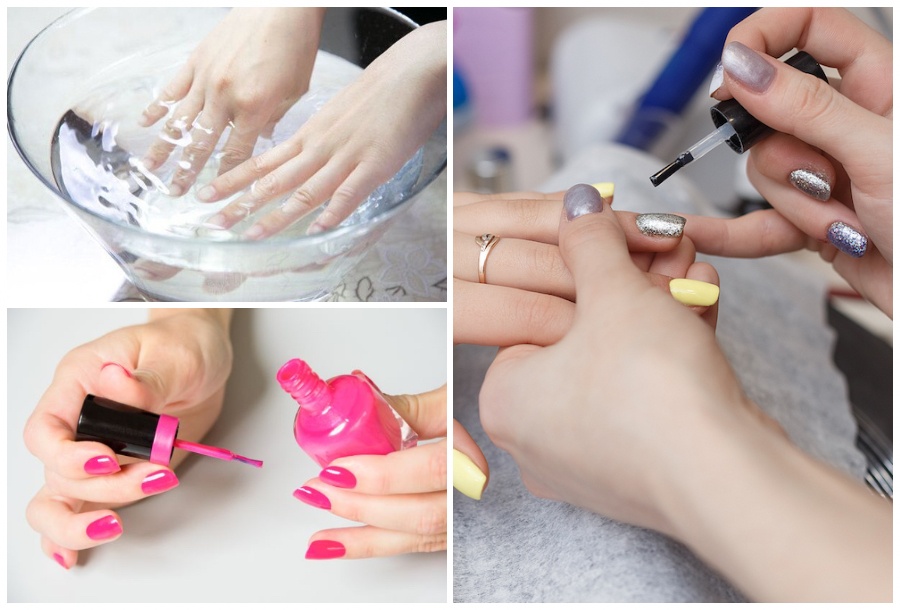
Step 1: Wipe off nail polish from nails using a Nail Polish Remover and Cotton.

Step 2: Use a Nail Cutter if your nails are too long to trim them. Otherwise, directly use nail filer to file your nails in a shape you desire. (It is advised to use the nail filer in one direction only)

Step 3: Dab on some olive oil onto each of your nails and a little bit on the back of your hands and massage gently for about 2 minutes. Start with massaging each of your nail separately in all directions, ensuring you concentrate on cuticle area. And then gently massage both your hands together. Use a cuticle trimmer to press cuticles (This is optional. After doing this treatment for few times you might not need a cuticle trimmer at all). I have stored my Olive Oil in old Nail Polish Remover bottle for Manicures.

Step 4: Dab on a little scrub onto your palm and with the use of few drops of water gently massage your nails, fingers and entire back of your hands for 2-3 minutes.
Step 5: Soak your hands in warm water (not hot water) for about 2-3 minutes and clean off oil and scrub from your hands. If you are in hurry, you can skip this step and instead rinse your hands under running water. It will still give you good results.

Step 6: Pat dry your hands gently with a towel and apply a moisturizer. Wait till your moisturizer gets absorbed completely before moving to next step.

Step 7: Apply nail polish to your nails and we are done.

Results: Following this manicure method twice a week or every time you change your nail polish will help you to combat dry or flaky skin caused by harsh weather. It will also help to repair skin damaged from overexposure to the sun. It will make your hands smooth and shining. You will notice a difference with first use itself.
Tips for keeping hands young and beautiful:
1. Wear hand gloves for doing everyday household chores. It will protect your hands from harsh detergents, soaps and agents.
2. Make a habit of carrying moisturizer in your handbag. Apply moisturizer multiple times during the day to keep your hands soft.
3. While cooking, ensure you use a cutting board for chopping vegetables. It will help in avoiding getting cuts and drying your skin.
Let me know how this treatment worked for you.
Manicure and Pedicure at Home
10 Steps for a Great Home Manicure


Thanks for the DIY dear….i have dry chapped hands 🙁
Hi Rashmita, do this twice a week. I am sure you will notice a difference
good advice .. I’m always forgetting the gloves and end up with splitting nails 🙁
yeah Aruna gloves helps a lot… it even prevents nail polish from chipping 🙂
I loved the DIY, I need to be punctual with this!
thanks Ila, I am sure it will work
Nice, thanks. my only manicure was during my pre bridal, will do it this weekend.
True Riya, we forget manicures… but this works great… Non – expensive option 🙂
Nice review !!! 🙂
thanks shruti!
really nice..easy to do as well..thanks..
thanks aru!
very nice 🙂 thanks 🙂
thanks ankita!
A simple DIY very well explained!! Should set aside time for this 🙂
thanks!
Priya,good DIY post..will try this weekend.. 🙂
wow..very well detailed DIY…I like it… :)))
Good tips.. these are easy to follow and do.. thanks..
superb n easy DIY..
aweeesome riya. 🙂 and i loved the idea of storing oil in a nail paint removal bottle. :)) totally feel like doing it now. your hands look so pretty . 🙂
Thanks Rati!
awesome post dear 🙂
aaj hi karti hoon 😀
Wow!! i loved this DIY Priya.. thanks for sharing!! 🙂 <3
Thank u so much for this article…My hands are in a very bad state…will definetly try this
Priya thanks for such a detailed article I will try this..
Wow! Nice detailed demonstrative review Priya!
True…we only think of pampering our legs with a pedicure…and often ignore manicure
Want to know the shade of the colorama polish u used here 🙂
Nice one Priya.. will give this a try for sure 🙂
nice post….very easy ..
Loved this..very easy to do..I will definitely try this one …thanks! 🙂
lovely tutorial…… will dfntly try dis…….
😀 i noticed sumth’g …. u lefty na?? as i m unable to apply nail paints on my right hand like u .. 🙁
yeah misthi i am lefty… n its a bit difficult for me to apply paint on left hand nails 🙂
Loved how you added pics 🙂
Good tip about olive oil… will definitely use that… :))
Nice tips yaar…I will definitely use it…in our busy schedule we all are forgot about these kind of easy tips…I need this really…. Thanks again priya… 🙂