Make your own Fluffy Flower Brooch: DIY
Hello beauties,

So are you all ready for a fun DIY? I can’t hear you all, are you all ready for a fun accessory DIY? Oh yes, I can hear you all now. So today we will be making a fluffy flower brooch with some left over or old fabric. Brooch is a very versatile accessory which one can wear in different ways anywhere from head to toe. We can wear it on a plain t-shirt/blouse to add some fun, on a clutch, hair, on belt on scarf and list goes on. So today we will make a fabric fluffy flower which is very summery and fun. Let’s get started then.

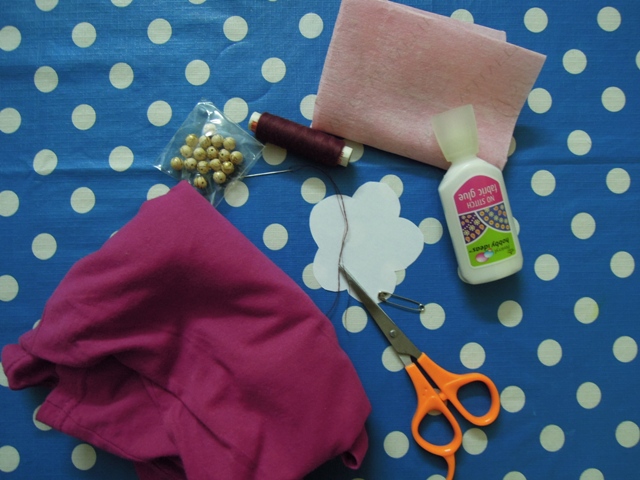
Things we will need:
• ½ meter fabric (any soft fabric), you can use old T-shirt also as I did.
• Felt for base, I could not get this so I used a thick paper I got with vellvette box as that feels quit close too felt, you can use any other thick fabric too.
• Fabric glue and needle thread
• Some decorative beads
• Safety pin
• Scissors.
• Plane paper to make flower template.
Step 1 & 2: Cut out a flower template (3 to 3/2 inch radius) on plain paper (you don’t need to be very precise, draw free hand). Put this template on the cloth and cut out 9 flowers.
Step3: Cutout a circle (2 inch radius) on felt or any thick fabric you are using for base.
Step 4 & 5: Take a flower and fold it in half then fold half again. Do this with all the 8 flowers.
Step 6 & 7: Apply glue in the center of the felt circle and paste 4 folded flowers in such a way that their corner meets in center of felt, as shown in picture.
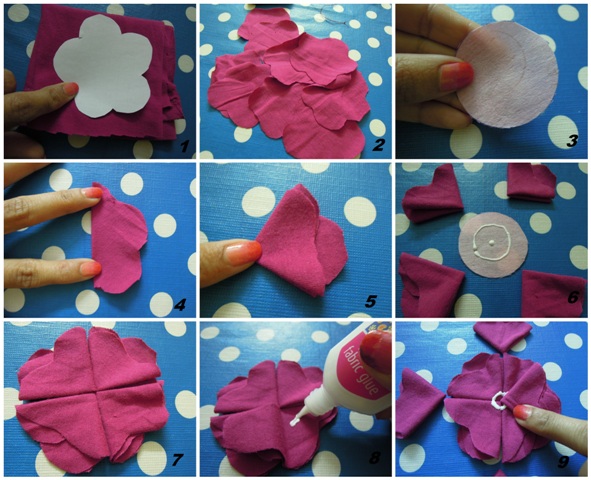
Step 8: Glue the folded flap to itself as shown in picture.
Step 9: Now glue the next four folded flowers on second level. Do it such a way that they are 45 degree from the first flowers (forgot all geometry you learnt in school, see the picture to understand what I said 😛 ) glue the folded flap to itself as we have done in step 8 for the first layer.
Step 10: At the end of step 9 you will start seeing some flowery patters on sides.
Step 11 & 12: Now for the center, take the last flower and fold it in half. Instead of folding it again roll it into a cone, with the fold being the narrow part of the cone and the petals being the wide part. We are making a rosebud type of effect here.
Step 13: Glue this bud at the center of the flower. Add more fabric flue and press it there for some time (you can see how hard I pressed it)
Step 14: To puff up this flower attach parts of the top layer of petals to the bud, to bring up the petals to the same level as the bud. Glue dots in place like in picture then attach it with the bud.
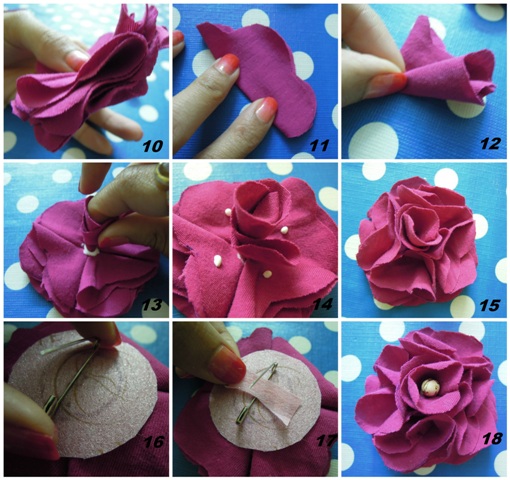
Step 15: This is how the flower will look like at end of step 1 to 14. You can glue petals to each other to create more body or can stop here itself, it’s up to you.
Step 16 & 17: Let the glue set for 5 minutes then flip the flower and attach the safety pin at the back. You can do it by sewing or use feviquick like I did. Take one small piece of felt or thick martial and paste on top of the pin to make it connect strongly. Now let it dry for few minutes.
Step 18: Once dried flip the flower and add a bead at the center of the flower to beautify it. That’s all you own fluffy flower brooch is ready.
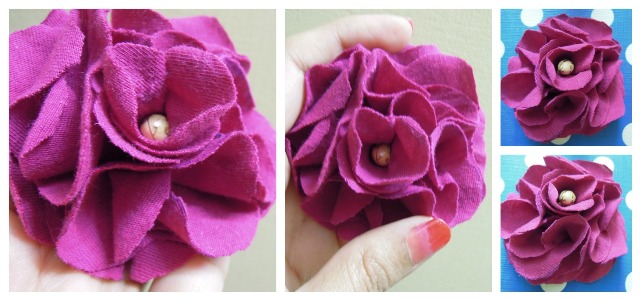
I have also attached a picture of how I wear it; you can use it to accessorize your look in many different ways (imagination is the limit). So go on girls make your brooches in all pretty colors or in prints and add fun to your look this summer!
Hope you all liked this tutorial and will make it too….
Aroma Magic Almond Nourishing Cream
Chanel Precision Hydramax + Active Nutrition Nourishing Cream
Fab India Coral Glow Face Pack
Easy Homemade Face Packs for Dry and Oily Skin
Anti Aging Homemade Face Pack (With Photos)
Quilled Flower Necklace: Do It Yourself
Make Your Own Rose Ring: DIY


*jai ho* *clap* very very cute sweta *puchhi* *haan ji*
Thanks Neha *puchhi*
superb shweta *whistle* *jai ho* *jai ho*
Thanks Mily 🙂
superb *pompom* *pompom* *jai ho*
Thank you Shital *thankyou*
omggg this is awesome… *jai ho* i dnt think i will hv that much of patience to make this though,,, great job 🙂
Thanks Natasha…. believe its no so tough max 20 minutes… I made it while watching TV *haan ji*
This is a really nice tutorial!! A very professional looking brooch too!
Thanks Fab *thankyou*
try this out
Looks very pretty *clap* *clap* *clap*
*thankyou* seetha
Hey sweta.. I really enjoyed it. would seriously try it out.. 😀 *pompom* *pompom*
*thankyou* Surbhi ji…
make one for Pehal *happydance*
haan yaar.. actually i thought of making a flower like this and putting on her plain T-shirts. 😀
It looks super good on the cap…!!! *clap* *clap*
yaa… you can make it in 3-4 colours to go with all her dresses. BTW in printed material also it looks quite good *haan ji*
you are really creative Sweta 🙂 I am sure you must be good in craft work even in your school *waiting*
me toh *duh*
Thanks Shipli 🙂
I used to do my bro and sis’s assignments too… coz I love doing it *haan ji*
wow sweta… i loved the ways you have put it to use… *jai ho* *jai ho*
Thanks Sahiba *puchhi*
wow.. Sweta.. your a super at craft… *jai ho* I’m so impatient at it.. the other day I was trying to make ur ring n gave up! 😛 But again I’ll try this now *pompom* *thankyou*
N i’m gonna use it on my bad! If at all I finish it 😛
Thanks Vidhi *thankyou*
So happy that u tried previous tut… i will suggest to use wider ribbon that will help you I feel as thin ribbon tends to fall out at time, try it again if you can with wider ribbon *happydance*
And you can make this brooch… its so easy, I am sure you will be able to *puchhi*
Thanks Sweta I’ll definitely try wid wider ribbon… N this one I’ll try this weekend.. 🙂 *thankyou* for ur suggestion *puchhi*
Very well explained! and cute!
*thankyou* ila
That’s brilliant Sweta.. *jai ho* *jai ho* i loved how you’ve used it.. *jalwa* *jalwa* I can never make it.. *cry* *cry*
*thankyou* Esha..
you can make it girl it is super easy… just try it out *puchhi*
*cry* *cry* thannkoos for the support Sweta.. but I’m real bad with craft.. *scared* *scared*
Then I will make one for you 🙂
count me in Sweta!!! Make one for me tooo *puchhi*
awww…Sweta.. *puchhi* *puchhi*
Cool and very creative Sweta *jai ho* *jai ho*
thanks Jomol 🙂
im loving the smileys soooooooooooooo much *cry* they make my day
Neha *hifive* I’m loving’em too.. *puchhi* *puchhi*
*hifive* me toooo……
come lets fight *duel* *duh*
Rashmita *duel* *duel*
hahaha smilies ka *jalwa*
I love them too….
my fev *hunterwali* and *spank*
😛
Esha…. come here u gal…. *duel* *duel* *duel* *duel* *duel* *duel* *duel* *duel* *duel* *duel*
rofl rofl rofl rofl
Me too Neha *pompom* I am not posting any comment without these cuties *haan ji*
Wowiee……. *pompom* *duh* rofl 🙂
*thankyou*
this one is so girlyyyy……loving it…… *clap*
*thankyou* rashmita 🙂
wow very nice Sweta.. *clap* *clap* I have done this before… I use hot glue or stitch it. You don’t find it difficult with the fabric glue? I tried using this fabric glue but it doesn’t adhere well *nababana*
no Dipti, I used fabric glue from hobby ideas… it worked perfectly 🙂
hmm.. I will try it again then.. I hope it works..using hot glue is a bit time consuming and you gotta be very careful while while using the glue gun..
but its very durable no… I was thinking of getting one for myself
And sweta u r seriously a Genius in craft making *clap* *clap* *clap*
I love reading these and try to do but…….. never able to finish it *cry* *waaa*
Do it while watching TV you won’t feel tired Shilpi 🙂
very b’ful…..nice work done …..likeeeee *clap* … *hifive*
*thankyou* Priyanka 🙂
awesome tut…
i ll definately try it… *pompom* *pompom*
*thankyou* *thankyou*
*thankyou* angle, do try it
*haan ji* soooo cutie cute cute *haan ji*
*happydance* thanks val
Wow such a lovely, easy, hand made brooch *happy dance* *happy dance* love this DIY Sweta *powder*
Try it out Manisha *pompom*
*powder* i hav made dis bt in difrent style i’l try dis (flufy)..
oh you did Anita … by stiching???
would love to know your style too 🙂
wooow awesome DIY… *woot* i totally loved it… rosy rosy *happy dance* *happy dance*
Thanks Saloni…. try it out gal *thankyou*
so very creative loved it….. Loving these smilies…. Happy happy dance dance *happydance* *happydance* *happydance* *puchhi* *clap* *clap* *clap* *happy dance*
Thanks Deepika…. *thankyou*
actually we all are loving the smilies *haan ji*
*whistle* super DIY.. need a *clap*
Thanks Nirmala *puchhi*
such creativity makes one feel jealous!!!!! *devil* *devil*
loved it dear!! *jai ho*
awwww…… you can do it too chhavi *puchhi*
awesome sweta:) super cute *puchhi* btw,do u knw if i can find hot glue online??
*thankyou* soundarya
yes you can find it online I saw it on ebay and one more site don’t remember the name now *haan ji*
*thankyou* sweta:)
wow dis is super awesome shweta.. 🙂 can’t wait to make colorful brooch for myself n my baby.. 🙂 *happydance* *thankyou*
loving these supercute smileys.. 🙂 *preen*
Hi neetu, long time…. how are you??? 🙂
yes do make for yourself and aadya *happydance*
Very cool! I love this DIY. *jai ho*
*thankyou* Rene 🙂
*thankyou* Nisita 🙂