Make your own Rose ring: DIY
Hello beauties,

I am back with a fun DIY for you all, and this time a DIY accessory. We all love roses and we all love rings, how cool is it to have a rose ring! I have seen rose rings in metal and plastic and stones but nothing can give the effect of rose until it’s not as colorful as real rose. Last weekend my niece was at our place and we did quite a lot of DIY projects together. She was craving for a ring after seeing my ring collection but my rings cannot fit her so I made a ring for her later I liked the finished product so much that I decided to make one for myself and share the idea with you all. So lets get started.

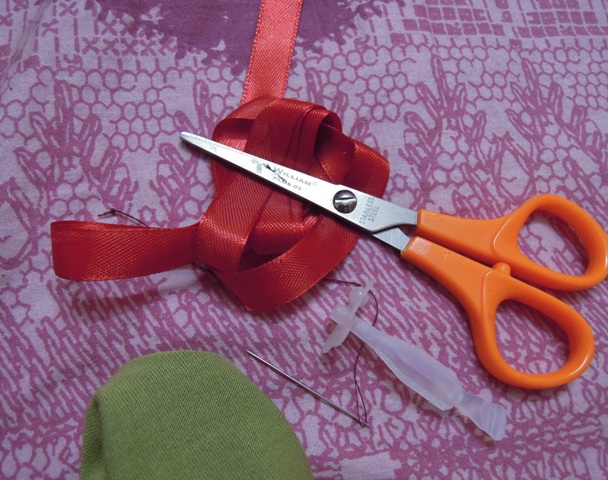
Here are the things you will need:
• Satin ribbon (I am using ½ inch one, you can use wider ribbon to make bigger rose)
• Wire or plain plastic or metal ring. (I used the ring from an old keychain)
• Small piece of some cloth
• Needle and thread
• glue
• scissors
Step 1: take half meter of ribbon and place a knot leaving 2 inch of ribbon on one side.
Step 2: Fold the ribbon on 90 degree as shown in picture.
Step 3: now start rolling the smaller side of ribbon (which is in your right hand) towards you to for the bud of rose.
Step 4: after 2 rounds you will get something like this. Now fold the ribbon (in your left hand) away from you as shown in picture.
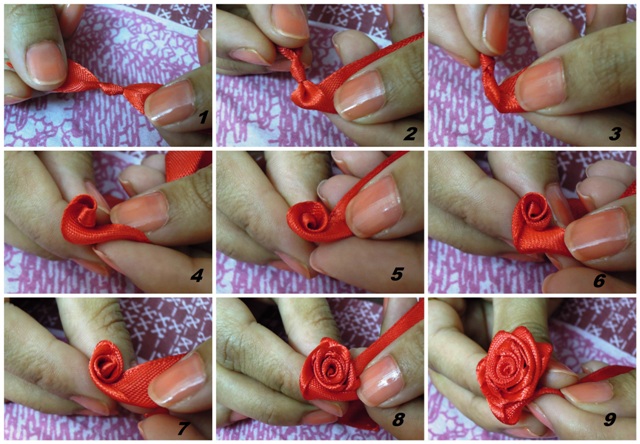
Step 5: roll the ribbon towards you till you reach end of the fold made in previous step.
Step 6: fold ribbon away from you again like you did in step 4.
Step 7: roll the ribbon towards you till you reach the end of fold, same way as you did in step 5.
Step 8: keep repeating step 6 and 7. You should start getting the rose structure by now.
Step 9: keep doing step 6 and 7 until you reach the end of ribbon.
Step 10: fold the last part of ribbon and bring it inside.
Step 11: secure the end part of ribbon at the base by sewing it.
Step 12: cut any extra ribbon. You can seal the end by passing it on candle flame quickly in case the threads are coming out.
Step 13: sew the base of flower properly to secure the flower structure.
Step 14: this is how your flower will look.
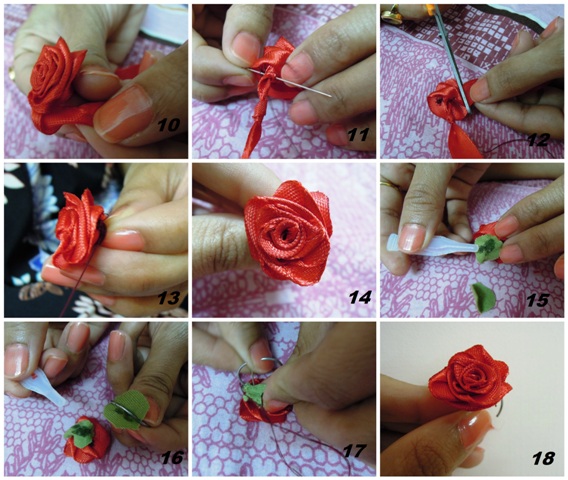
Step 15: now take 2 small (preferably round) piece of some cloth. Secure one on the base of the satin rose with glue. This is done to give even surface to rose’s back, this will help in fixing the flower on ring.
Step 16: bring the other cloth piece inside the ring and secure with glue as done in picture. Apply some more glue on top of ring and place it on back side of flower.
Step 17: you can sew everything together to make the connation strong (here comes out the electronics engineer in me 😛 )
Step 18: Tada your own satin rose ring is ready.
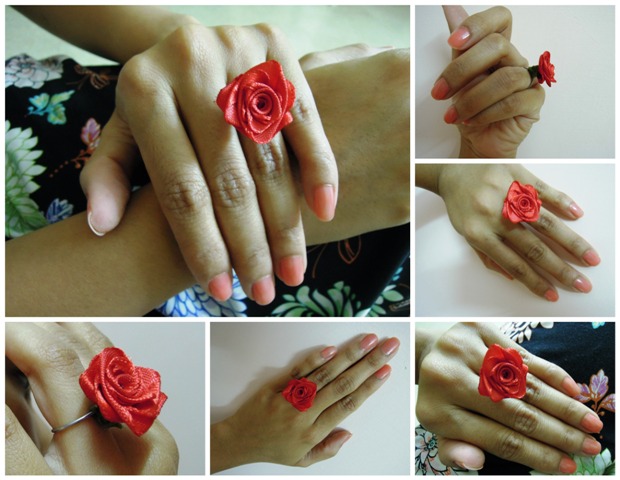
You can make this rose ring in any colour or in all the colours to match with all your outfits. These roses can be used to make studs, or to decorate hair clips and hair bands. They look fun and very feminine. I hope you all liked this DIY and will try it too.
Till next article take care ladies and stay stylish.
PS: I went overboard with the pictures this time as Mr. Photographer was in the mood for clicking the ring 😉
Nail Polish/Earring Organizer: DIY
How To Make A Simple Makeup Organizer – Do It Yourself
Chanel Precision Hydramax + Active Nutrition Nourishing Cream
Fab India Coral Glow Face Pack
Easy Homemade Face Packs for Dry and Oily Skin
Anti Aging Homemade Face Pack (With Photos)
Biotique Pistachio Ageless Nourishing & Revitalizing Face Pack
Lotus Herbals Face Pack Review: Teatreeclear,Claywhite, Marinyouth
10 Tips for Glowing Skin from Kitchen Shelf


omggggggg how pretty! i m loving the pics!u mysterious lady!
hehehe … Thanks Neha 🙂
wooow amazin
i have done these roses during craft classes in school.. 🙂
Try them again Rama…. it will be fun 🙂
Oh my god Sweta..why didn’t you show us your full face??? loved the DIY..are you wearing colorama lacquer on your nails?? I am wearing the same shade right now.. 🙂
I am so shy Esha 😛
Yse I am waering colorama lacquer in coral chic… lovely shade this is no ?? 🙂
haan even I’m wearing this one.. really lovely.. he he he..
this will be fun! thanks for sharing 🙂 awesome pics 🙂
Thanks Vidhi…. try this out 🙂
lovely!
Thanks Ila 🙂
wow, that’s so pretty 🙂 which lip color is that n the nail paint I wanna know abt that too..
thanks Shilpi 🙂
On my nail I have colorama lacquer in coral chic and on lips diana of london baccara rose lip liner …
Sweta… nice.. I had learnt how to make satin roses long back.. But never made them into accessories… I will use them in my accessories now..
Great you indulged in DIYs when your niece was there with you.. 😀 what all did you make?
Thanks Dipti…. I made the ribbon bracelet you shared on IMBB and she loved it 🙂 (thankyou for that)
I also mede one neckless for her and we made a photoframe for her parent’s wedding anniversary…. will share thous pics some time soon, may be in next DIY 😀
moderation…. help Neha 🙁
done!
Thanks Neha 🙂
wow Sweta.. that sounds amazing.. share all the pics.. soonestttt.. me waiting.. 😀 😀
wow awesomeness !!! All your DIY’s are so creative 🙂
Thanks Soumya…. do try it out 🙂
i wanna knw which shade of lippiie u r wearing loved it
I am wearing diana of london baccara rose lip liner on my lips… its reviewd on IMBB Cherry 🙂
o wow i love all your pics… 🙂 🙂
Thanks Sahiba 🙂
It’s sooo pretty sweta
Thanks Abeer… try it out 🙂
Love the pics! Adds an element of mystery!
Thanks AMN 🙂
Wowww wowww wowww so pretty Sweta, such a perfect rose.. 😀 And the pics are lovely 🙂
Thanks Lakshmipriya… try out this one 🙂
This looks shoooooo damn pretty and beautiful would love to try it… Superb tutorial Sweta 🙂 🙂
Thanks Saloni… try it out 🙂
this is so cool! i learnt making satin rose ribbons in childhood too but in a different way, urs is super easy too 🙂 thanks
different way, the folding way???
try this one too Aparajita 🙂
ya, sweta… the folding way 😀 never tried this though… will surely make this for myself, wanted a huuuuuge rose ring since long and the online sites wale are way too overpriced :-/ thanks for saving my bucks :*
you are welcome dear … 🙂
thats true similar things they sell online for but way overpriced…
Wow Sweta….the pics are so cool….Which took the cake should i say? Ur lips or the ring? Am confused…. seriously :)) :)) both rocked and am honestly loving your lip shade..looks so gud on you.
hehehe thanks Melissa 🙂
Such a lovely rose n an easyy tute sweta:)
Thanks soundarya.. try it out 🙂
wow i love the lipstick you are wearing..so neat 🙂
thanks Balpreet 🙂
wow!! This s so amazing!! This actually gave me the idea of making a cute hair accessory rather thn a ring!! I luvd it….Please do more DIY:)
Thanks Renji…. I will do more 🙂
Such a pretty rose Sweta, and hot lips! Which lippi r u wearing?
Thanks TA… I am wearing diana of london baccara rose lip liner on my lips 🙂
hey…great diy…and i love ur nail paint…<3
thanks Spriha 🙂