Festive Reverse Smokey Eye Makeup Tutorial
Hello IMBBians!

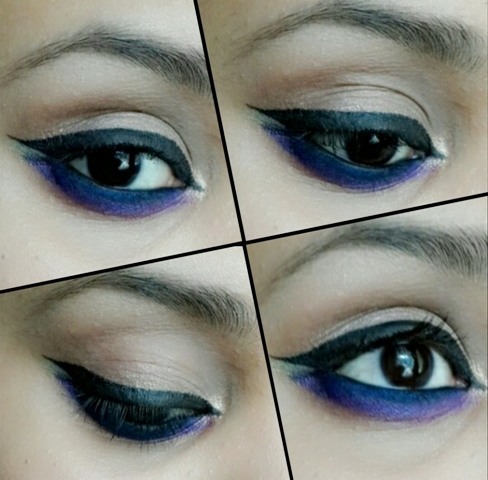
My favorite kinds of articles are tutorials. Whether I write them or someone else does, there is such a thrill in learning tips and tricks from makeup enthusiasts. In this tutorial, I wanted to share my take on a trend I see often online these days – the Reverse Smokey effect. All of us know about a traditional smokey eye, where there is color on upper lid in a dark, fading out aka smokeying-out way – from the inner to the outer corner. In reverse smokey, the same principle is used but in 2 different ways. If it is on the upper lid, the darkest color is towards the inner corner and lightest on the outer. Or the smokey effect is created below the lower lash line leaving the upper lid free of color. Today, I share the latter technique here. For this festive season, this different take on a smokey effect will be sure to turn a few heads!
Products Used:
• Urban Decay Electric Palette Pressed Pigment Palette
• Urban Decay Naked Palette
• MAC Fix+ Spray
• L’Oreal Paris Super Liner Waterproof Gel Eyeliner in Black
• Maybelline Colossal Volume Express Waterproof Mascara
• Purely Pro Cosmetics Blush- Universal

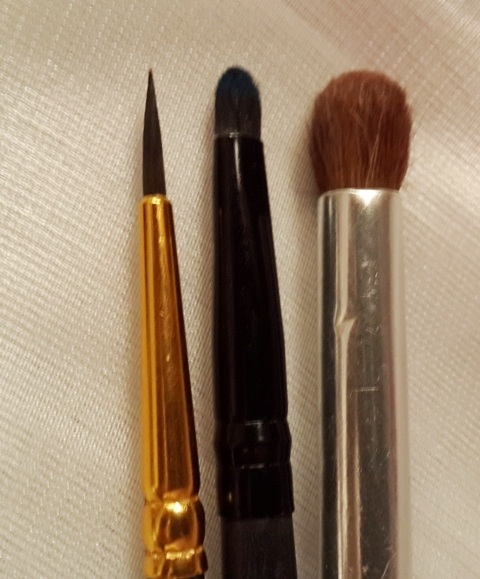
Brushes Used:
• E.L.F Small Precision Brush was used to apply the colors Chaos, Jilted, Urban, Freak & Toasted; just wipe the brush on a face wipe between each color .
• E.L.F. Professional Blending Eye Brush was used to blend out the colors for a smokey look using the Universal blush shade, to pat on Naked+Toasted on the upper lid & to apply compact+Virgin on the brow bone.
• The Liner brush is a stationery paint brush which says “3 Fine Art Taklon S-412” on it. (A stationery/art store is a great place to find many makeup brushes).
Step-by-step Instructions:
Step 1:
I first primed my eyes with an eye primer & applied my compact pressed powder over it, to give me an even base.
Step 2:
I then applied the gel liner as kajal and blended the edges into the lashes, nothing precise or dark.
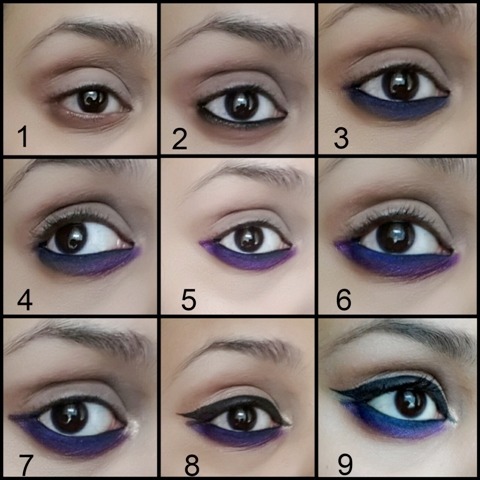
Step 3:
Then I took the shade Chaos from the Electric Palette and applied it over the blended out kajal and smoked it as low as I wanted to go. This look is about being color heavy on the lower lid, so go forth and experiment with as low you want with the color.
Step 4:
Then taking the colors Jilted mixed with Savage, I applied it on the inner half overlapping with the blue placed there but keeping in mind not to cover the blue completely, just half-way through.
Step 5:
In a similar way, I took the shade Urban and applied it on the outer half below the blue also creating a winged out shape with it.
Step 6:
I then deepened the blue and the purples because the applying and blending of the colors dims the intensity, so this is a good time to re-apply and adjust how strong you want the colors to pop. Then I used a light pink, here a blush shade from Purely Pro in shade Universal to smoke out/blend below the purple colors.
Step 7:
Then in the inner corner, for some brightness, I applied the shade Toasted.
Step 8:
Then I applied a mix Toasted and Naked shades on the upper lid with a light hand. On the brow bone I applied a mix of my face compact & the shade Virgin. Also, I applied gel liner in a winged-out cat eye shape, making sure to create a gap between the purple color placed lower.
Step 9:
In the gap created between the 2 wings, I applied the light green Freak for a contrasting highlight.
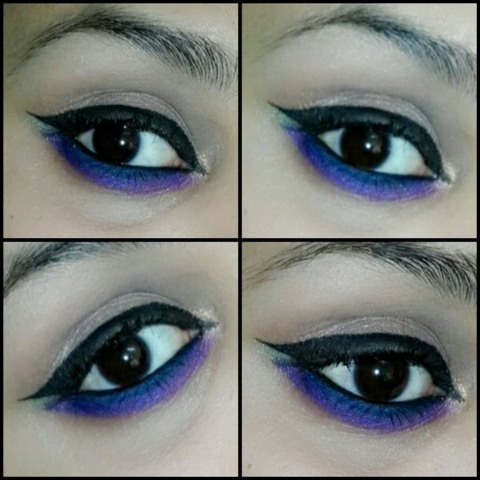
This finished the look for me; I touched up my concealer, applied mascara and voila was done with the look! This festive season, this can be a different look you can try, no matter how colorful the outfit you wear is, there is always place even just below the lower lid to incorporate them all. Add some glitter in the inner and outer corners and you can make this looks ultra glamorous. Our upper lids get a lot of attention; let’s give lower area some love too and just have fun with it!
I hope this helped, wishing everyone Happy Festivities & Happy Makeuping!
Baby Pink Smokey Eye Tutorial
Soft Smudgey Smokey Eyes Tutorial
Smoky Brown Eye Makeup Tutorial
Glittery Eye Makeup Tutorial
Easy Office Eye MakeUp Tutorial
Copper Eye Makeup Tutorial
Diwali Festive Makeup Looks using Maybelline Instaglam Boxes
Dussehra Festive Eye Makeup Tutorial


Very interesting Nafisa 🙂
Thanku Neha! 🙂
wow 🙂 it looks perfect
Thanku Kiransingh ! 🙂
Perfect festive look 🙂
Thanku Vini! 🙂
Puuurrrfect eotd:-p
Thankuuuu Mona! 🙂
you dooo stunning eye makeup nafisa. Loved every bit of this look. just stunninggg!!! :)) wish you a very happy diwali 🙂
Thanku sooo much Rati 🙂 means the world coming from u! Happy Diwali to u too 🙂
This is simply stunning and amazing.. The blue and black is opening up the eyes… And you have done it sooo neatly.. Beautiful eyes you have got 😀 😀
Thanku Kadambari! 🙂 so appreciate your lovely words!
ohh my Goodness ! its such stunning eye makeup …so vibrant but so pretty …
i really wish i could do this effortlessly ….and carry so beautifully !
Thanku soo much Archana!! 🙂
Awaooo!! why modeY ??
very trendy makeup look
love it