Subtle Red Gold Party Eye Makeup Tutorial
Hello Ladies,

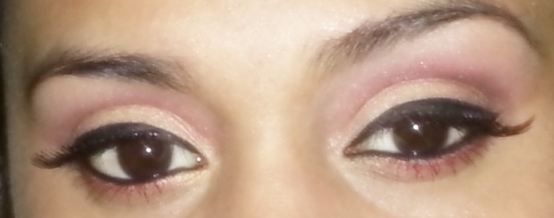
Its the season of weddings and with that, it brings party makeup! For me, the color that comes to the mind first when we in India think of weddings or parties is red, but it is such a strong color that it usually just ends up on our dress or lips and seldom on our eyes. So, I wanted to try a wearable red eye makeup with gold and this is the look I created and wanted to share with you all. I want to first thank other beautiful girls who put up tutorials using collages, which has inspired me to try that too. I love this style of presenting tutorials!
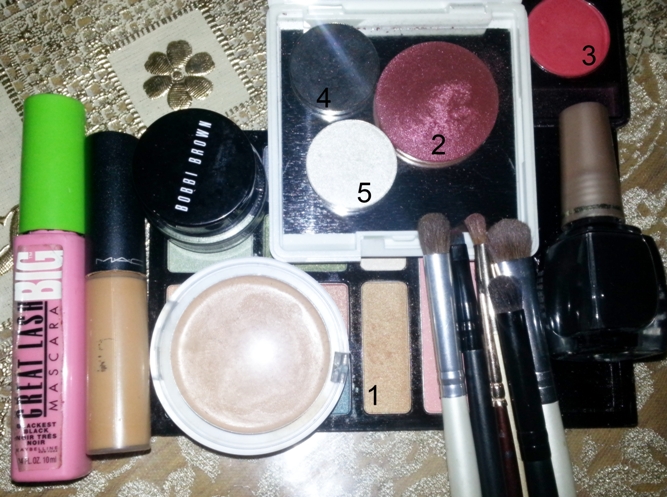
For this look, I used the following:

The eyeshadows I used are:
1. Aztec Gold – ULTA.
2. Plum Shimmer – Diana of London.
3. Red from Palette 32 – Javico Cosmetics (A middle eastern brand).
4. White Silver Hotpot – Coastal Scents.
5. Gunmetal Hotpot – Coastal Scents.
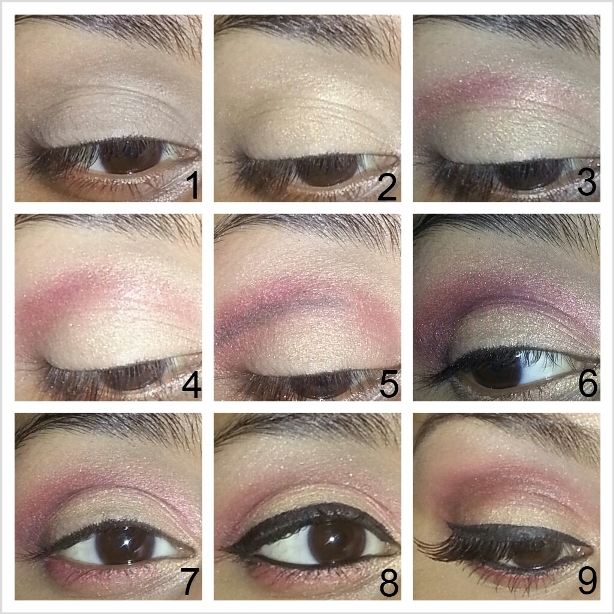
Step-By-Step Tutorial:
Step 1:
I applied a cream concealer in a lighter shade to act as a base for my eyeshadows and to neutralize the lid color.
Step 2:
I then applied a light gold all over my lids, past the crease space too.
Step 3:
Taking a rusty, plum color, I placed it in the crease. If you have hooded eyes, then just look straight ahead into the mirror and place the color right on the area that is visible above the lid, when you have your eyes open, so that you create an illusion of a crease and to blend it, use downward strokes so that the color blends with the color on the lid and does not encroach on the brow bone area.
Step 4:
I then blended the plum color out by picking up a little of the red eyeshadow with the same brush.
Step 5:
To deepen the crease color further, I applied some black eyeshadow.
Step 6:
Going back and forth between the plum and the red I blended the black color out till I was satisfied with the color and shape of the color on my crease.
Step 7:
I applied the light gold on the inner lower waterline and a mixture of the red and plum on the outer 2/3rd.
Step 8:
I then applied some black gel liner on my lids and also applied it on my lower and upper waterlines and followed it with mascara. I used silver as a brow bone highlight color as it would contrast well with the gold.
Step 9:
To further add some oomph, I applied some false lashes. The ones I used are from ELF Hollywood Lashes, these are super long and look super fake, so I just cut almost 2/3rd off it and used the remaining. I love the effect falsies add to any eye look.
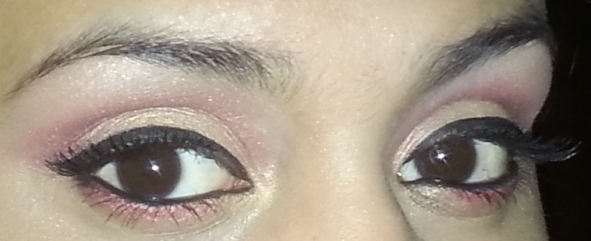
And that’s it! Done! The idea behind using red and plum together is that, just red can look very intense and will take the focus away from everything else. If mixed with a red based plum or even a deep, warm reddish brown, the color looks very muted and subtle. It’s still very red, but very wearable I feel. I used black to just make the color appear darker. On the lower lid too, just red can give the eye a very tired look, so mixing it up with another color just makes it look better I feel. Red is not an easy color to pull off but it is a beautiful color and deserves to be used especially for festivities. Hope you girls like this look.
Thank you for your time in reading this and happy Makeuping!
Dark Blue Smokey Eye Makeup
Shimmery Grey Black Smokey Eye Makeup Tutorial
Silver Plum Eye Makeup Tutorial
Lakme Eye Quartet Botanica Green Eye Makeup Tutorial
Easy Office Eye MakeUp Tutorial
Silver Smokey Eye Makeup Tutorial
Eye makeup tutorial using MAC Siahi Fluidline
Golden Black Eye Makeup Tutorial
Easy 3-minute Neutral Eye Makeup Tutorial
Eye Makeup: Soft Smokey Eyes- Makeup Tutorial
Blue Pink Eye Makeup Tutorial
Eye Makeup Tutorial : Golden Bronze
Diwali Makeup Tutorial – Glitterly Golden Blue Eyes
Estee Lauder Blue Dahlia Eye Makeup Tutorial
Pretty Green Eye Makeup Tutorial
Soft Green Eye Makeup Tutorial
Golden Brown Eye Makeup Tutorial





wow. great tutorial.. your mascara gives such a wonderful effect. i want..
Thanks Sugisoni 🙂
the mascara sure is gr8 but hhere I have used falsies too 🙂
yeah… my bad… oops…
You have gorgeous eyes Nafisa and the tutorial is awesome and so detailed! thank you!! 😀
Thanku Tinkerbell!! 🙂 & most welcome 🙂
Woooow naf was missing ur posts and tutorials…it’s been quite sometime that u have written..like always it goes without saying ur tutorial and look are just awesome….u do it with such a finesse ….keep going …
Hey abeer! i knw, its been a while!
♥ thanks love 🙂
hiii nafisa 😛 the program is over kya?
gorgeous as always , welcome back! 🙂
Hi!! 😀 yeah 😛
Thanks & thanks! 🙂
NAFISA..!!! i missed ur tutorials.. 🙂 This one is fab.. pretty eyes. 🙂
Thanks Raji! I missed doing them too 🙂
Wonderful! And I love the falsies on your eyes, they look natural and gorgeous! 🙂
Nafisa your skin looks so radiant! 🙂
Thanks Shruti! 🙂
for skin, I believe thats the effect of Revlon Photoready Foundation, it just photographs so well! 🙂
Awww… soooo nice to see you a tutu from you Nafisa after a long time. You should do more tuts more often 😀 loved it :-*
Thanks Surabhi! 🙂 surely will do 🙂 :*
Nafisa, welcome back, loved your tutu 🙂
Jomol!!!! ♥ thankusss! 🙂
Gorgeous!!! lovely tutorial….u r really good at it!
Thanks Vinita! 🙂
omg nafisa havent seen your tutes for sometime now and what a comeback eotd! II will swoon of the floor looking at your perfect eye make up! Wish i could do such perfect liners in about a hundred years!!!!!!!!!!!!!!!!! I loved the idea of red with plum! Thank you so much for sharing it!
lol @swoon 😀 u can surely manage gud eye liner…even for me, it comes with loads of practice 🙂
thanks so much Sandhya 😀 glad u likd it 🙂
Wow ur eyes looking beautiful…donno when i will learn this makeup tricks…..
Thanks Chhaya 🙂 keep tryin, it’l come to u 🙂 loads of different tutorials on IMBB itself..m sure u can find some techniques that speak to u 🙂
I have to try this form of lining the eyes – it looks beautiful must say. and the lashes – you`ve trimmed it off at the perfect length – it looks truly amazing this way ^_^
and which lash glue do you use ?
Thanks Arja 🙂 trimming lashes is so scary! 1 wrong cut n it can be a total fail but glad this time it worked fine 🙂
i forgot the name of the lash glue i used, its somethin with D, it’s not DUO but somethn similar to that..i found it at local cosmetic store, will update this space when I get home from work & check the name 🙂
went into moderation 😐
Nafisa….rescuing 🙂
Aww… it’s beautiful nafisa..:) I wish to do same.. dnt know wen.. :p loved urban tute n gorgeous eyes… keep coming in dear!
Thanku Neetu! 🙂
It’s ur sorry.. :p
thats gorgeous nafisa! i love love your eye makeups n u got to teach me how to apply such dark eyeliner! its beautiful!
Thanku so much Parita!! 🙂 i think what gives eyeliner the most intense look is layering liquid liner over gel eyeliner…it also makes it look neater 🙂 do try that out 🙂
wow……loved it .. so detailed & yet simple 🙂 your eyes are gorgeous.. & i wish i could see your face. Your skin looks so good 🙂 I am surely trying this look soon
thanks monika 🙂 for skin, like I told Sruthi, I believe thats the effect of Revlon Photoready Foundation, it just photographs so well! 🙂
i will try sharing a full faced tutorial pic 🙂
in the last photo ur eyes look so gorgeous 🙂
Thanku Mayuri! 🙂
Nafisa..grt gal..u pulled off the shades like a pro..good job!!!
Thanks Nidhi! 😀
Wow!! your eyes are gorgeous!! wonderful EOTD
Thanku Shami! 🙂
u have pretty eyes Nafisa
Thanku AL 🙂
killer eyes you have got Nafisa ..love the EOTD 🙂
🙂 thanks Misha!
gorgeous eyes you have nafisa … 🙂
Thanku Kinjal! 🙂
Nafisa. your skin sooooo good. what is your shade in Mac?
Thanks Siri 🙂 I’m NC40
hey really love the tutorial well explained!
Thanks Priyanka! 🙂
Love this make up!
Thanks Domi! 🙂